Wayfinder is hosted in Azure
This article covers granting Wayfinder access to an AWS cloud account (target account) when Wayfinder is installed in Azure (home subscription), and you're using Wayfinder's identity for authentication.
Jump to the Quick Start section for steps on how to create a new AWS Cloud Access.
Overview
Workflow
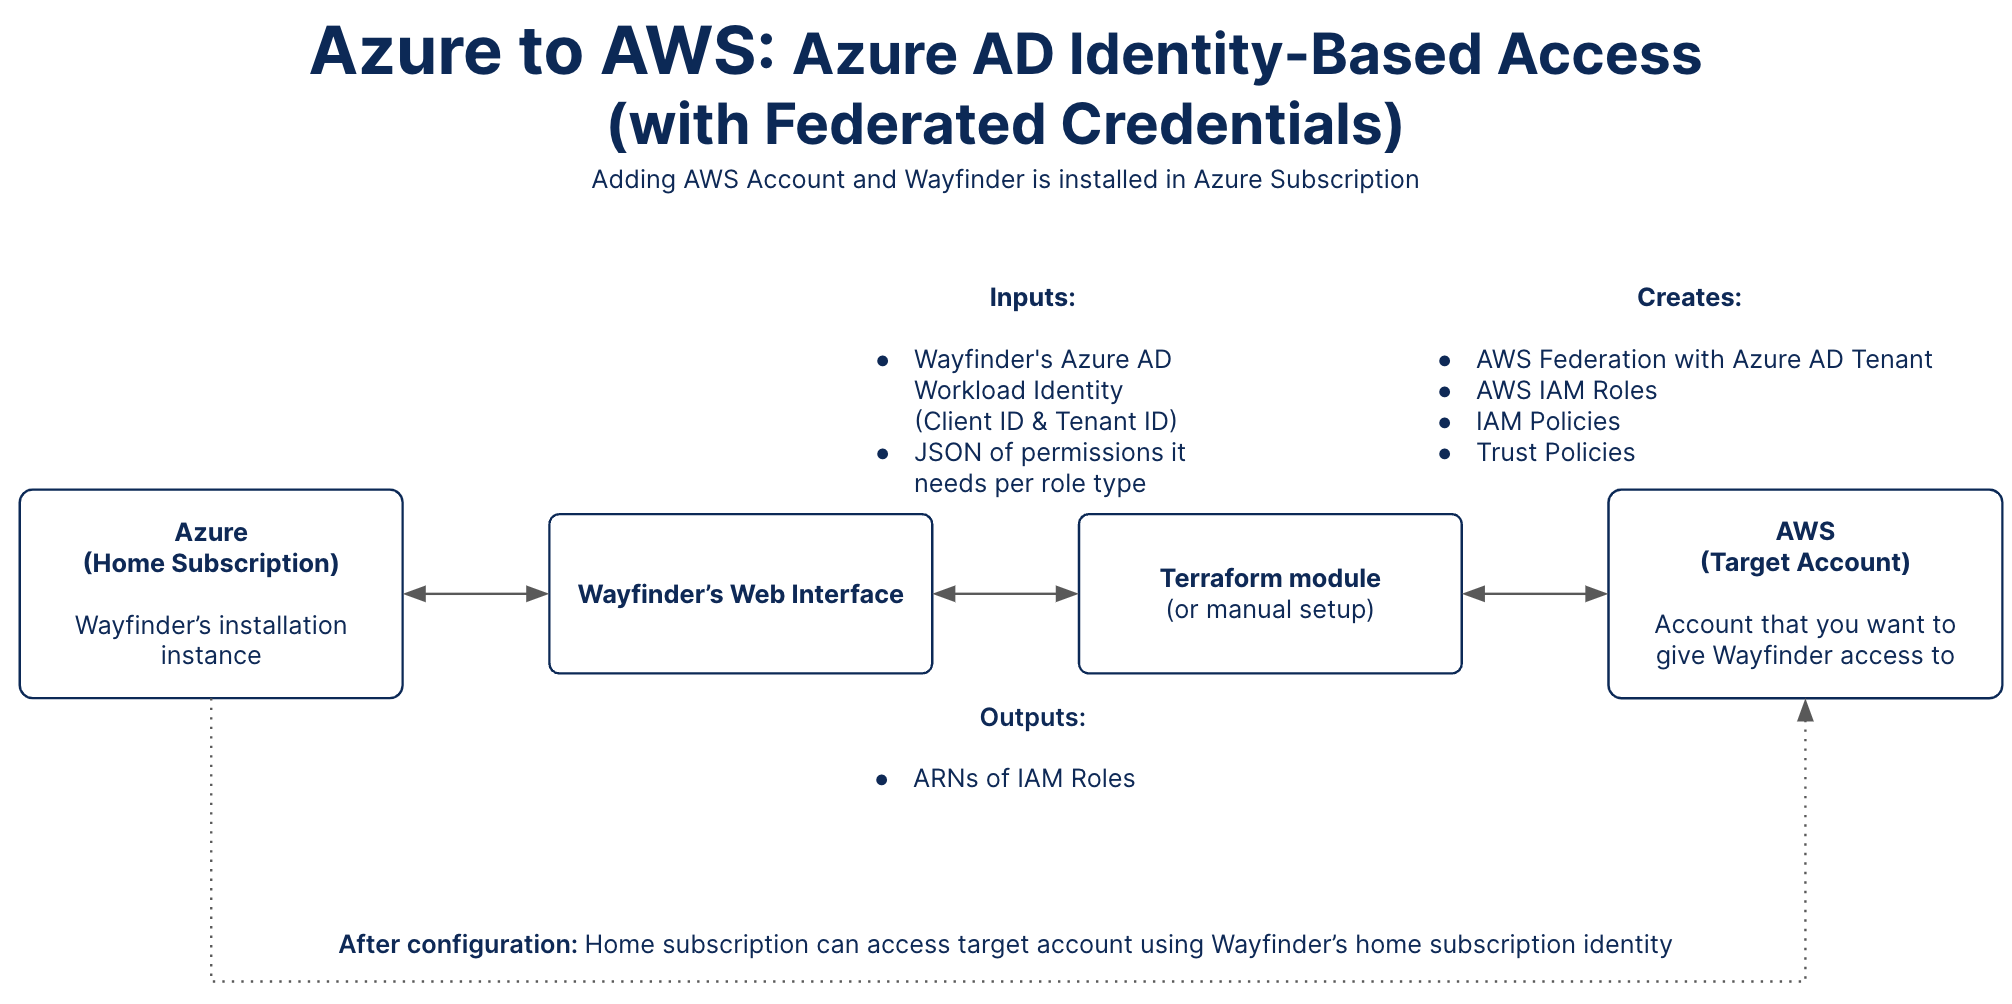
Wayfinder's web interface provides you with the Client ID and Tenant ID values of Wayfinder's Azure Workload Identity and an outline of the permissions Wayfinder need to manage cloud resources in the target account.
Use Wayfinder's terraform module to create the necessary AWS Federation with the Azure AD Tenant, AWS IAM Roles, the IAM Policies and Trust Policies in the target account. Wayfinder's Client ID and Tenant ID values are needed to create the AWS Federation with the Azure AD Tenant to form the trust between the home subscription and target account. The permissions are needed to create the IAM Policies for the AWS IAM Roles. See a full list of Wayfinder's terraform module input values. You can also do this configuration manually.
Wayfinder's terraform module will return the ARNs of the AWS IAM roles that were created in the target account. These ARN values need to be pasted in the respective fields in Wayfinder's web interface or the relevant CRD fields (Kind:CloudAccessConfig) if you're using Wayfinder's CLI.
After you apply the cloud access configuration, either using Wayfinder's web interface or CLI, then Wayfinder will be able to use its own identity to connect to the target account.
Home Subscription Details
Wayfinder's Azure AD Workload Identity is the Client ID and Tenant ID of the Azure AD Managed Identity which trusts Wayfinder's Kubernetes Service Account. If you installed Wayfinder using Wayfinder's install terraform module, this will have been created for you during install. If not, you need to provide the Client ID and Tenant ID as values to the Helm chart on installation.
You use the Client ID and Tenant ID values when you configure a trust relationship between the home subscription and the target cloud account.
Use Wayfinder's web interface to locate Wayfinder's Workload Identity or look it up manually in Azure.
Target Account Details
You need to configure a AWS Federation with the Azure AD Tenant in the target account to form the trust between the home subscription and the target account.
Each AWS IAM Role needs to be correctly configured with an IAM Policy containing the permissions Wayfinder need and a Trust Policy to outline the trust relationship between AWS Federation and the AWS IAM Roles.
Use Wayfinder's terraform module to configure the AWS Federation with the Azure AD Tenant, AWS IAM Roles, the IAM Policies and Trust Policies in the target account on your behalf or create it manually in AWS. Wayfinder's web interface displays the input values for the terraform module on the sidebar when you reach the Step 4 - Permissions section. CLI users can use the wf describe cloudaccess --cloud-identity CLOUDIDENTITY-NAME --to-cloud TARGET-CLOUD --for-type ACCESS-TYPE --for-stage STAGE-NAME --for-workspace WORKSPACE-KEY -o tfvars command.
CLI Quick Reference
| Instruction | CLI Command |
|---|---|
| Create a workspace (only if Access Type is Kubernetes Cluster Provisioning) | wf create workspace WORKSPACE-KEY -s SUMMARY |
| Create a stage (only if Access Type is Kubernetes Cluster Provisioning) | wf create stage STAGE-NAME -d DESCRIPTION |
| View Cloud Access Configurations | wf get cloudaccessconfig -c CLOUD -w WORKSPACE-KEY |
| Output the Cloud Access Configuration to console | wf get cloudaccessconfig CONFIG-NAME -o yaml |
| Output the Cloud Access Configuration to file | wf get cloudaccessconfig CONFIG-NAME > ./PATH/TO/FILE.yaml |
| Apply the Cloud Access Configuration from file | wf apply cloudaccessconfig -f ./PATH/TO/FILE.yaml |
| View Cloud Permissions | wf get cloudpermissions |
| View the Permissions of the specified Cloud Permission | wf describe cloudpermissions PERMISSION-NAME -c CLOUD -o JSON |
| View input values for Wayfinder's terraform module | wf describe cloudaccess --cloud-identity CLOUDIDENTITY-NAME --to-cloud TARGET-CLOUD --for-type ACCESS-TYPE --for-stage STAGE-NAME --for-workspace WORKSPACE-KEY -o tfvars |
| View cloud identities | wf get cloudidentities |
| Output the details of the cloud identity to console | wf get cloudidentities NAME-OF-IDENTITY -o yaml |
| Create a cloud identity for Wayfinder's workload identity (You only have to do this once) | wf create cloudidentity CLOUDIDENTITY-NAME --for-workload-identity |
| [ADVANCED USERS] Create a Cloud Access Configuration | wf create cloudaccessconfig [flags] |
Considerations
For each account that you want to connect, you need to:
- Decide what type of cloud access you need.
- Decide the scope of the cloud account (workspace and stage).
Note that some access types are designated as 'administrative' for configurations that are outside the scope of any particular workspace or stage and are intended for Wayfinder administrators. - Decide what type of authentication method you want to use. This guide outlines using Wayfinder's identity (Azure AD Identity-based Access).
- Give Wayfinder cloud permissions to access cloud resources and perform relevant tasks. At this point you should have already run Wayfinder's terraform module to create the needed configuration and permissions in the target subscription (or have done this configuration manually). You need to verify that the permissions are assigned correctly by using Wayfinder's web interface.
Quick Start: Add a new AWS Cloud Access
CLI Steps
The easiest way to create a new AWS cloud access configuration is to edit an existing one.
- Copy one of the cloud access configuration (yaml) examples or output the yaml of an existing Cloud Access Configuration to file.
- Review the permissions that Wayfinder needs.
- Use Wayfinder's terraform module to configure the target subscription (or do the configuration manually).
- Apply the yaml of the Cloud Access Configuration that you've edited.
Wayfinder's Web Interface Steps
- Select Admin, then navigate to Cloud > Access.
- Select Amazon Web Services.
- Click the Add AWS cloud access button
- You are presented with the Add AWS cloud access page. There are four main sections to complete.
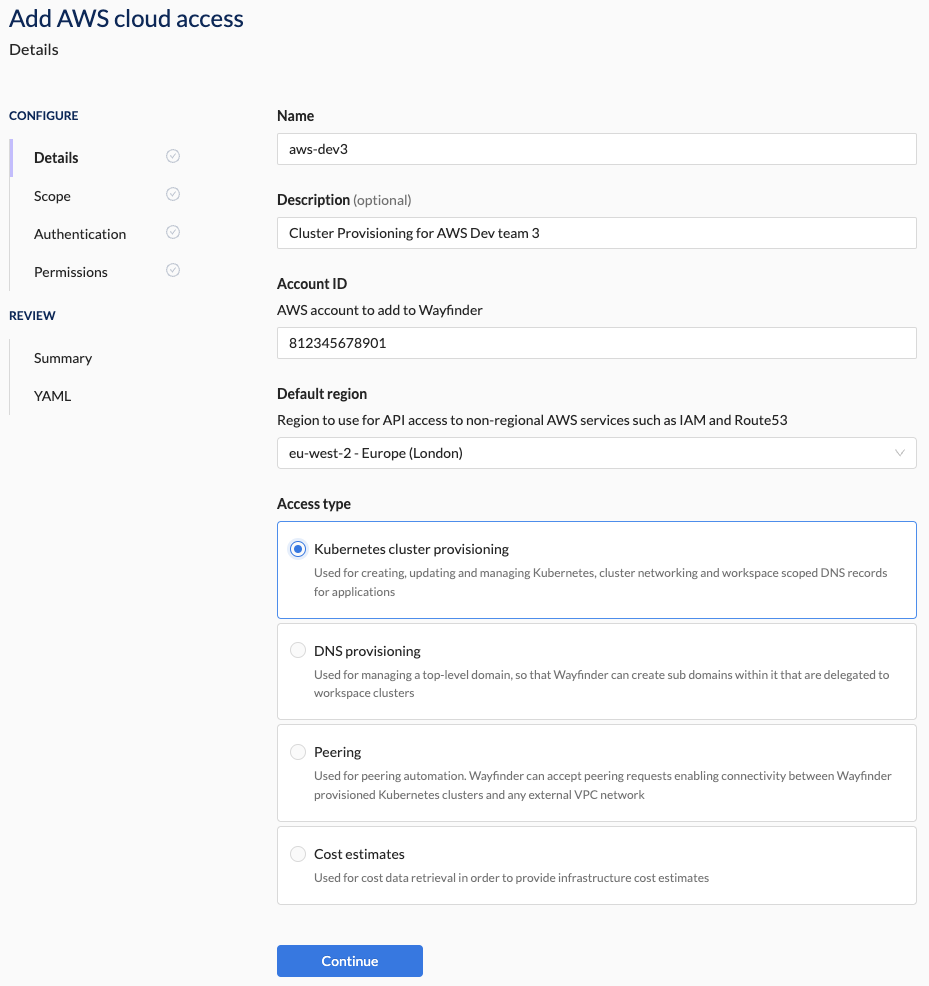
1. Details Section Steps
- Enter the Details for the new cloud access.
- Enter the AWS Account ID for the AWS account that you want to give Wayfinder access to.
- Select the Default Region to use for API access to non-regional AWS services such as IAM and Route53.
- Select the Access Type that this cloud access connection is for e.g., Kubernetes Cluster Provisioning
Example
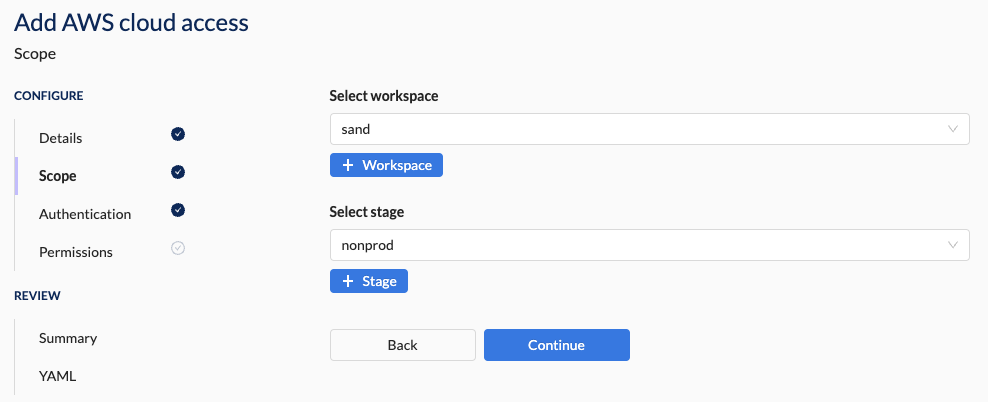
2. Scope Section Steps
- Select a workspace from the drop-down list or create a new workspace.
- Select a stage from the drop-down list or create a new stage.
The Access Type determines if the Scope section is editable or skipped. If skipped then the Scope is designated as 'Platform'.
Example
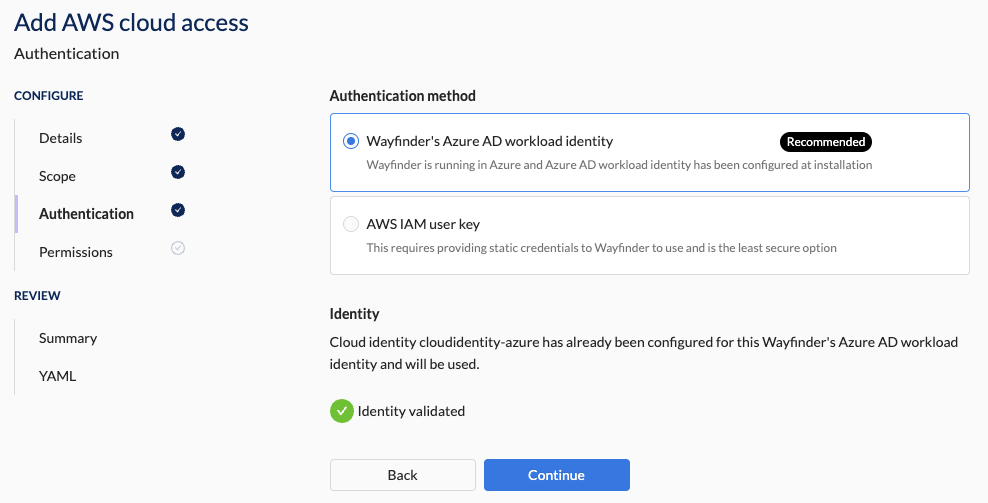
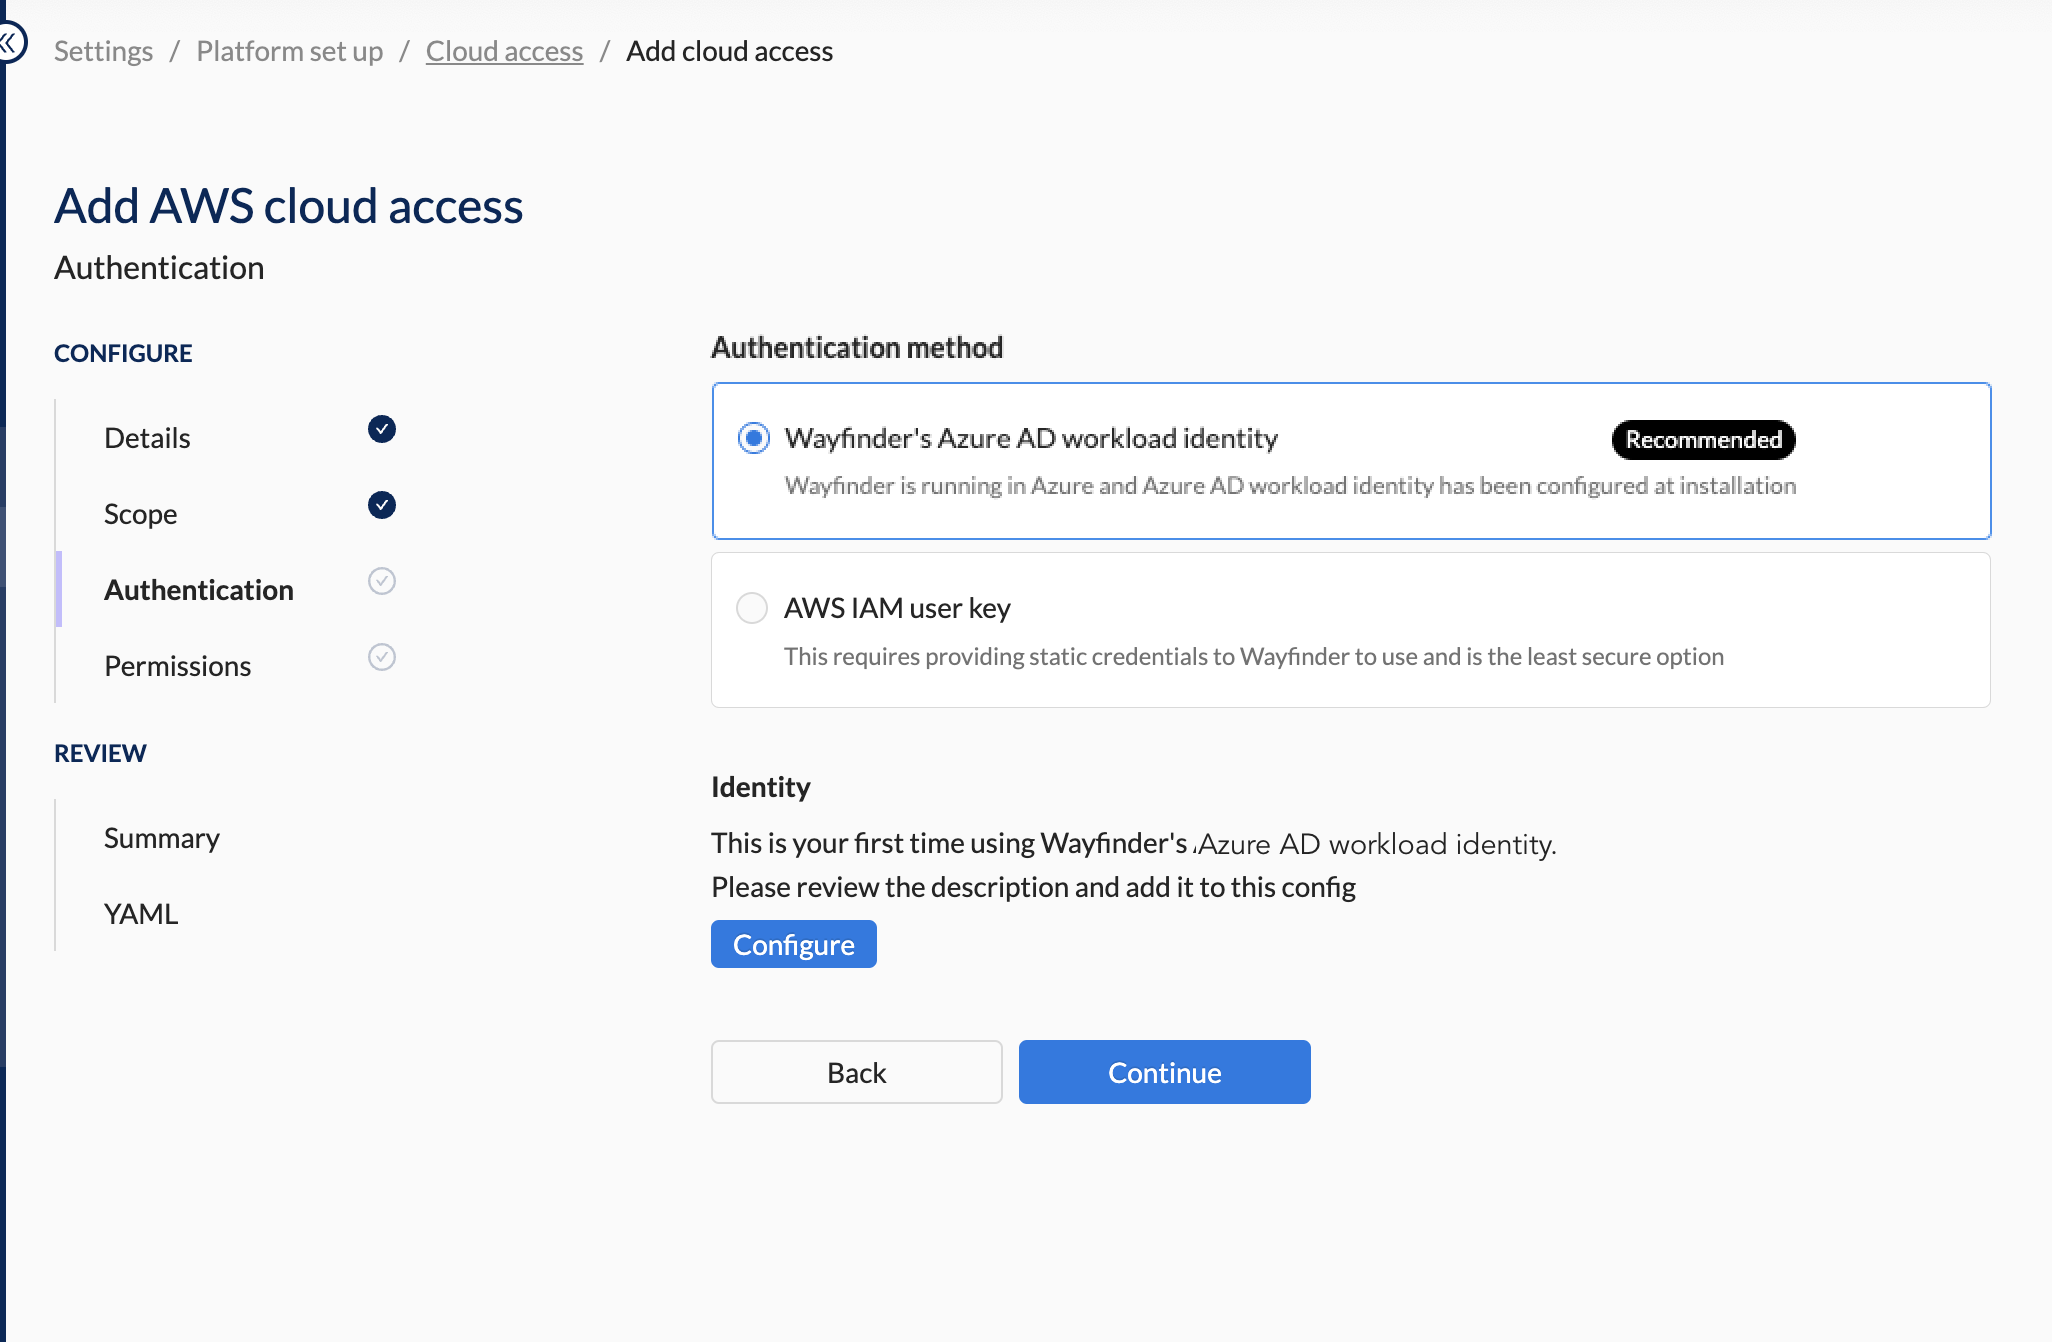
3. Authentication Section Steps
- Select Wayfinder's Azure AD Workload Identity as the Authentication Method.
Example
4. Permission Section Steps
You need to either run Wayfinder's terraform module to set up the needed cloud configuration in the target account or manually do the configuration. The right-hand panel will provide the needed input values for Wayfinder's terraform module. For more information see the Workflow section.Example of what you'll see on the right-hand panel as input values for Wayfinder's terraform module
resource_suffix                           = "-app1-nonprod"
enable_cluster_manager                    = true
enable_dns_zone_manager                   = true
enable_network_manager                    = true
enable_cloud_info                         = false
from_aws                                  = false
from_azure                                = true
wayfinder_identity_azure_client_id        = "90123456-efgh-7890-abcd-1234efgh5678"
wayfinder_identity_azure_tenant_id        = "87654321-abcd-458d-aa01-0123abcd1234"
Example of Wayfinder's terraform module output values
Outputs:

wayfinder_cloudaccess = {
  "cluster_manager_role_arn" = "arn:aws:iam::812345678901:role/wf-ClusterManager2023202323"
  "dns_zone_manager_role_arn" = "arn:aws:iam::812345678901:role/wf-DNSZoneManager2023202323"
  "network_manager_role_arn" = "arn:aws:iam::812345678901:role/wf-NetworkManager2023202323"
}
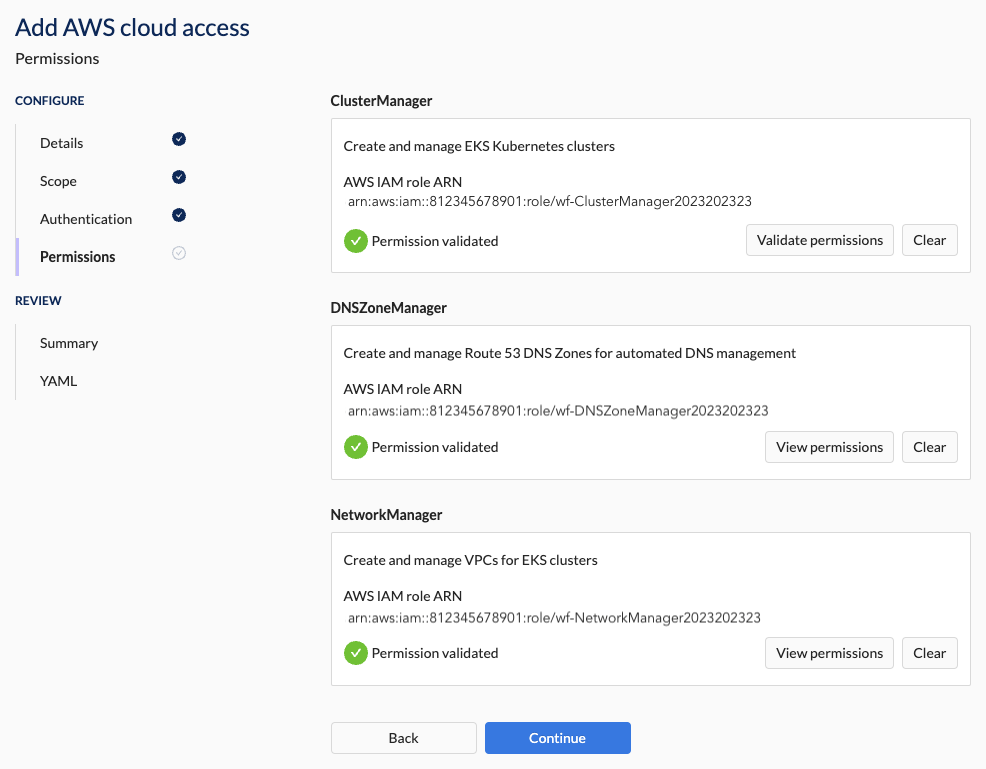
- Select the ClusterManager's Configure button.
- Paste in the role name of the IAM role you configured in the target account. If you used Wayfinder's terraform module then it will be one of the output values.
- Click the Validate button. You need to resolve any error messages before you can continue.
- Repeat the steps above for DNSZoneManager and NetworkManager.
Example
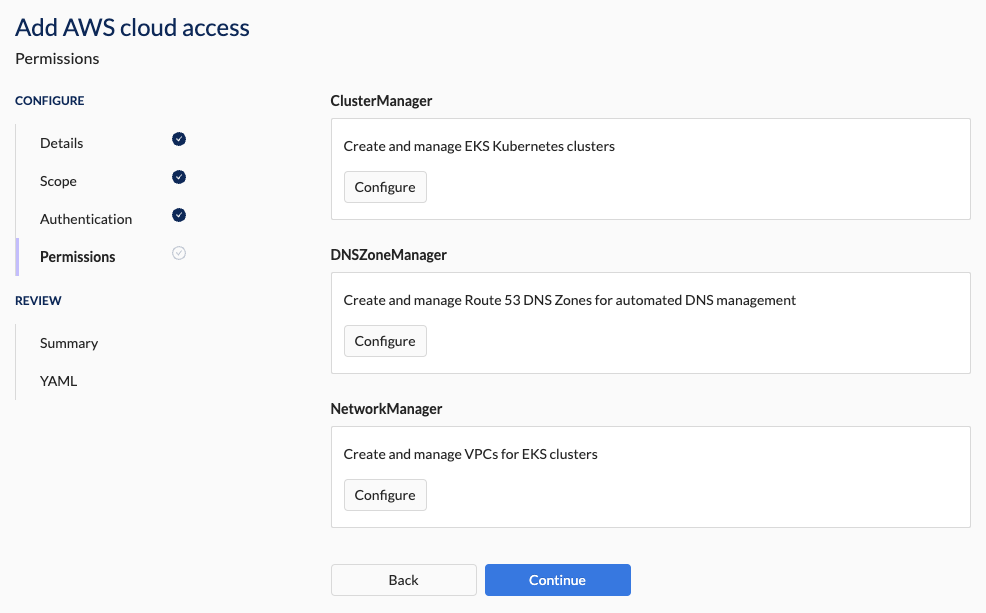
Fix any errors by either running Wayfinder's terraform module or update the permissions manually.
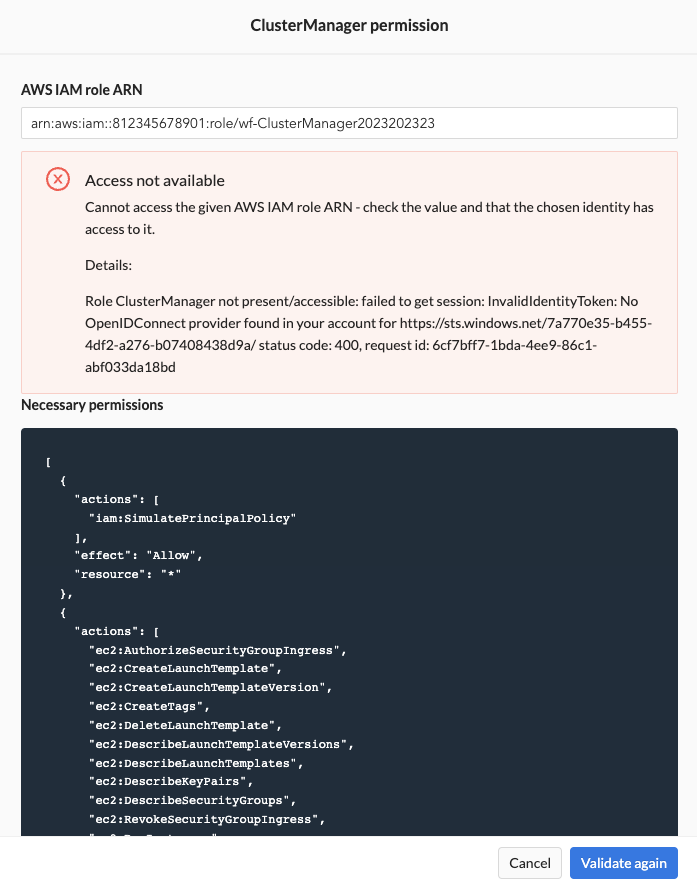
You will be able to proceed once the permissions are validated successfully.
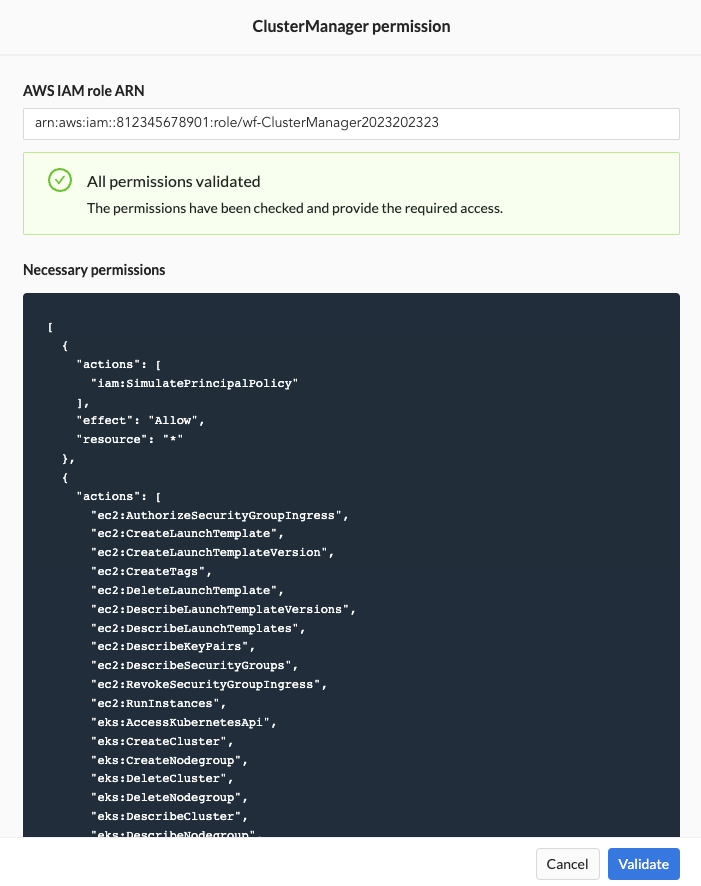
All permissions must be validated successfully before you can proceed to the Summary section.
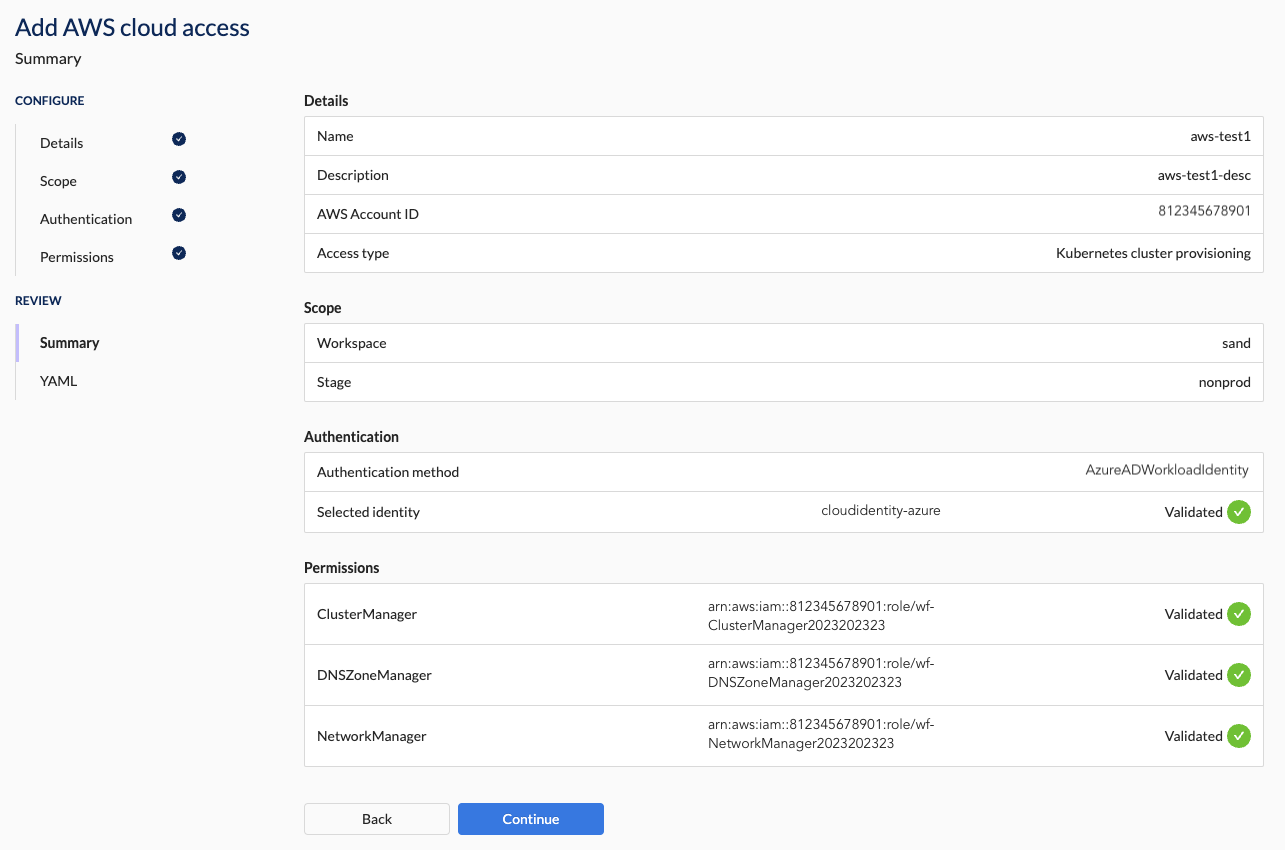
5. Summary Section Steps
- Verify that all the details are correct.
You will not be able to apply the configuration if any of the validations failed.
Example
6. YAML Section Steps
- Press the Apply button to apply the configuration.
- Alternatively, download the YAML and apply it using Wayfinder's CLI or your CI pipeline.
AWS Cloud Access Properties
The following sections outline the properties that you'll need to connect your cloud account to Wayfinder. These properties are mirrored in the corresponding CRD manifests (in YAML format) generated by Wayfinder. CLI users can refer to the information in this section to understand how the settings from Wayfinder's web interface correlate with the respective YAML files.
Refer to the previous section for the quick start steps on how to add a new AWS Cloud Access.
Details Section Properties
This section specifies the general properties and access type for the AWS Account you're adding.
| Field | Description |
|---|---|
| Name | The name of this cloud connection |
| Description | A meaningful description for this cloud connection |
| AWS Cloud Account ID | Specify the AWS Cloud Account ID that you're connecting to. |
| Default Region | Region to use for API access to non-regional AWS services such as IAM and Route53 |
| Access Type | The type of automation Wayfinder should provide. Option(s):
|
Each cloud account you connect is for the purpose of one of the 'Cloud Access Type' and each will have a different scope.
Scope Section Properties
When you've selected the Access Type as 'Kubernetes Cluster Provisioning', you need to set the scope to control where you want to provide the access to. This section is not visible for other Access Types.
What is the difference between a workspace and a stage?
- A workspace is where teams provision and manage applications, environments, clusters, and cloud resources.
- A stage is used to isolate and test resources at the infrastructure level such as production or development.
What is 'platform' scope?
Access types that are designated as 'platform' are for configurations that are outside the scope of any particular workspace or stage and are intended for the use by Wayfinder administrators.
| Access Type | Description | Scope |
|---|---|---|
| Kubernetes Cluster Provisioning | Used for creating, updating and managing Kubernetes, cluster networking and workspace scoped DNS records for applications. | Workspace and Stage |
| DNS Provisioning | Used for managing a top-level domain, so that Wayfinder can create sub domains within it that are delegated to workspace clusters. | Platform |
| Peering | Used for peering automation. Wayfinder can accept peering requests enabling connectivity between Wayfinder provisioned Kubernetes clusters and any external VPC network. | Platform |
| Cost Estimates | Used for cost data retrieval in order to provide infrastructure cost estimates. | Platform |
| Private Links (Azure only) | Used when Wayfinder is installed in Azure, and you need to grant it access to a private cluster within a private virtual network (VNet) | Platform |
Create a new workspace
You can create a new workspace if the existing ones don't meet your needs.
| Field | Description |
|---|---|
| Select workspace | The workspace that can use this cloud account. |
| -- New workspace (button) | Creates a new workspace. |
| --- Name | The name for the new workspace. |
| --- Description | Meaningful description for this workspace. |
| --- Key | Unique 3-5 character identifier for the new workspace. |
CLI Examples
Create a workspace
FORMAT: wf create workspace WORKSPACE-KEY -s SUMMARY
EXAMPLE:
wf create workspace sand -s "My sandbox workspace"
◉ Waiting for resource "org.appvia.io/v2beta1/workspace/sand" to provision (background with ctrl-c)
✔ Successfully provisioned the resource: "sand"
Create a new stage
You can create a new stage if the existing ones don't meet your needs.
| Field | Description |
|---|---|
| Select stage | The stage that can use this cloud account. |
| -- New stage (button) | Creates a new stage. |
| --- Name | The name for the new stage. |
| --- Description | Meaningful description for this stage. |
CLI Examples
Create a stage
FORMAT: wf create stage STAGE-NAME -d DESCRIPTION
EXAMPLE:
~ wf create stage nonprod -d "non production stage"
✔ Successfully requested the resource "org.appvia.io/v2beta1/stage/nonprod"
✔ Successfully created the stage
Authentication Section Properties
This section specifies the properties to authenticate your Wayfinder instance with your cloud account.
| Field | Description |
|---|---|
| Authentication method | The method in which Wayfinder will authenticate itself to the account. Option(s): - Authenticating without credentials -- Allows Wayfinder to authenticate itself using its own identity instead of static credentials. --- Note: For fresh installs you need to Create a New Workload Identity (once off task) -- Option presented to you will depend on where Wayfinder's instance is installed: --- Azure AD Managed Identity (when Wayfinder's instance is installed on Azure) --- See respective documentation for when Wayfinder is installed in AWS or GCP -- Auto-detection: Presents the Azure AD Managed Identity of Wayfinder's Workload Identity - Credential-based Access -- Please see 'Use AWS static credentials' |
Create a new Workload Identity
Note that you only need to do this once.
You need to create a cloud identity for Wayfinder's workload identity when you have a fresh installation of Wayfinder, it is the first time that you're adding a Cloud Access and you're using credential-less authentication.
Use wf create cloudidentity CLOUDIDENTITY-NAME with the --for-workload-identity -c CLOUD flags to create the cloud identity.
wf create cloudidentity cloudidentity-azure --for-workload-identity -c azure
In Wayfinder's web interface:
- Create a new Cloud Access and progress to the Authentication page (see Quick Start guide for steps)
- Select Wayfinder's Azure AD Workload ID as the authentication method
- Click the Configure button. Note that you will only see this button if you haven't previously created a cloud identity for Wayfinder's workload identity.
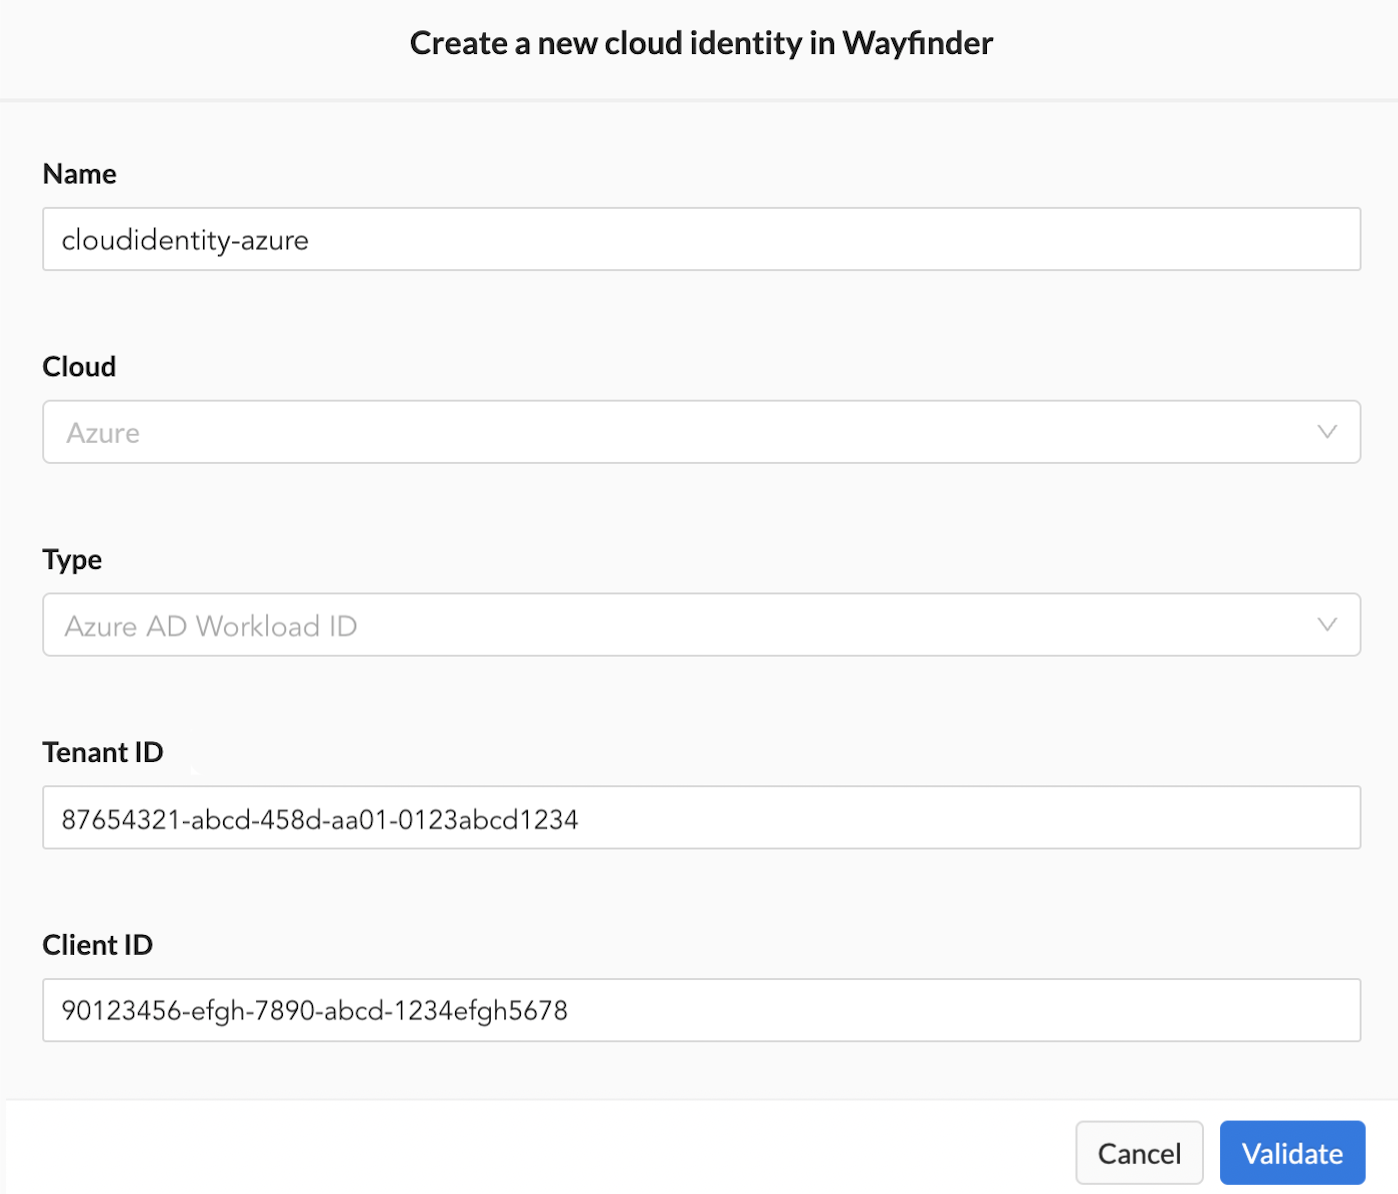
- Fill in the details as outlined in the properties table below.
- Click on the Validate button. All validation must pass before you can continue.
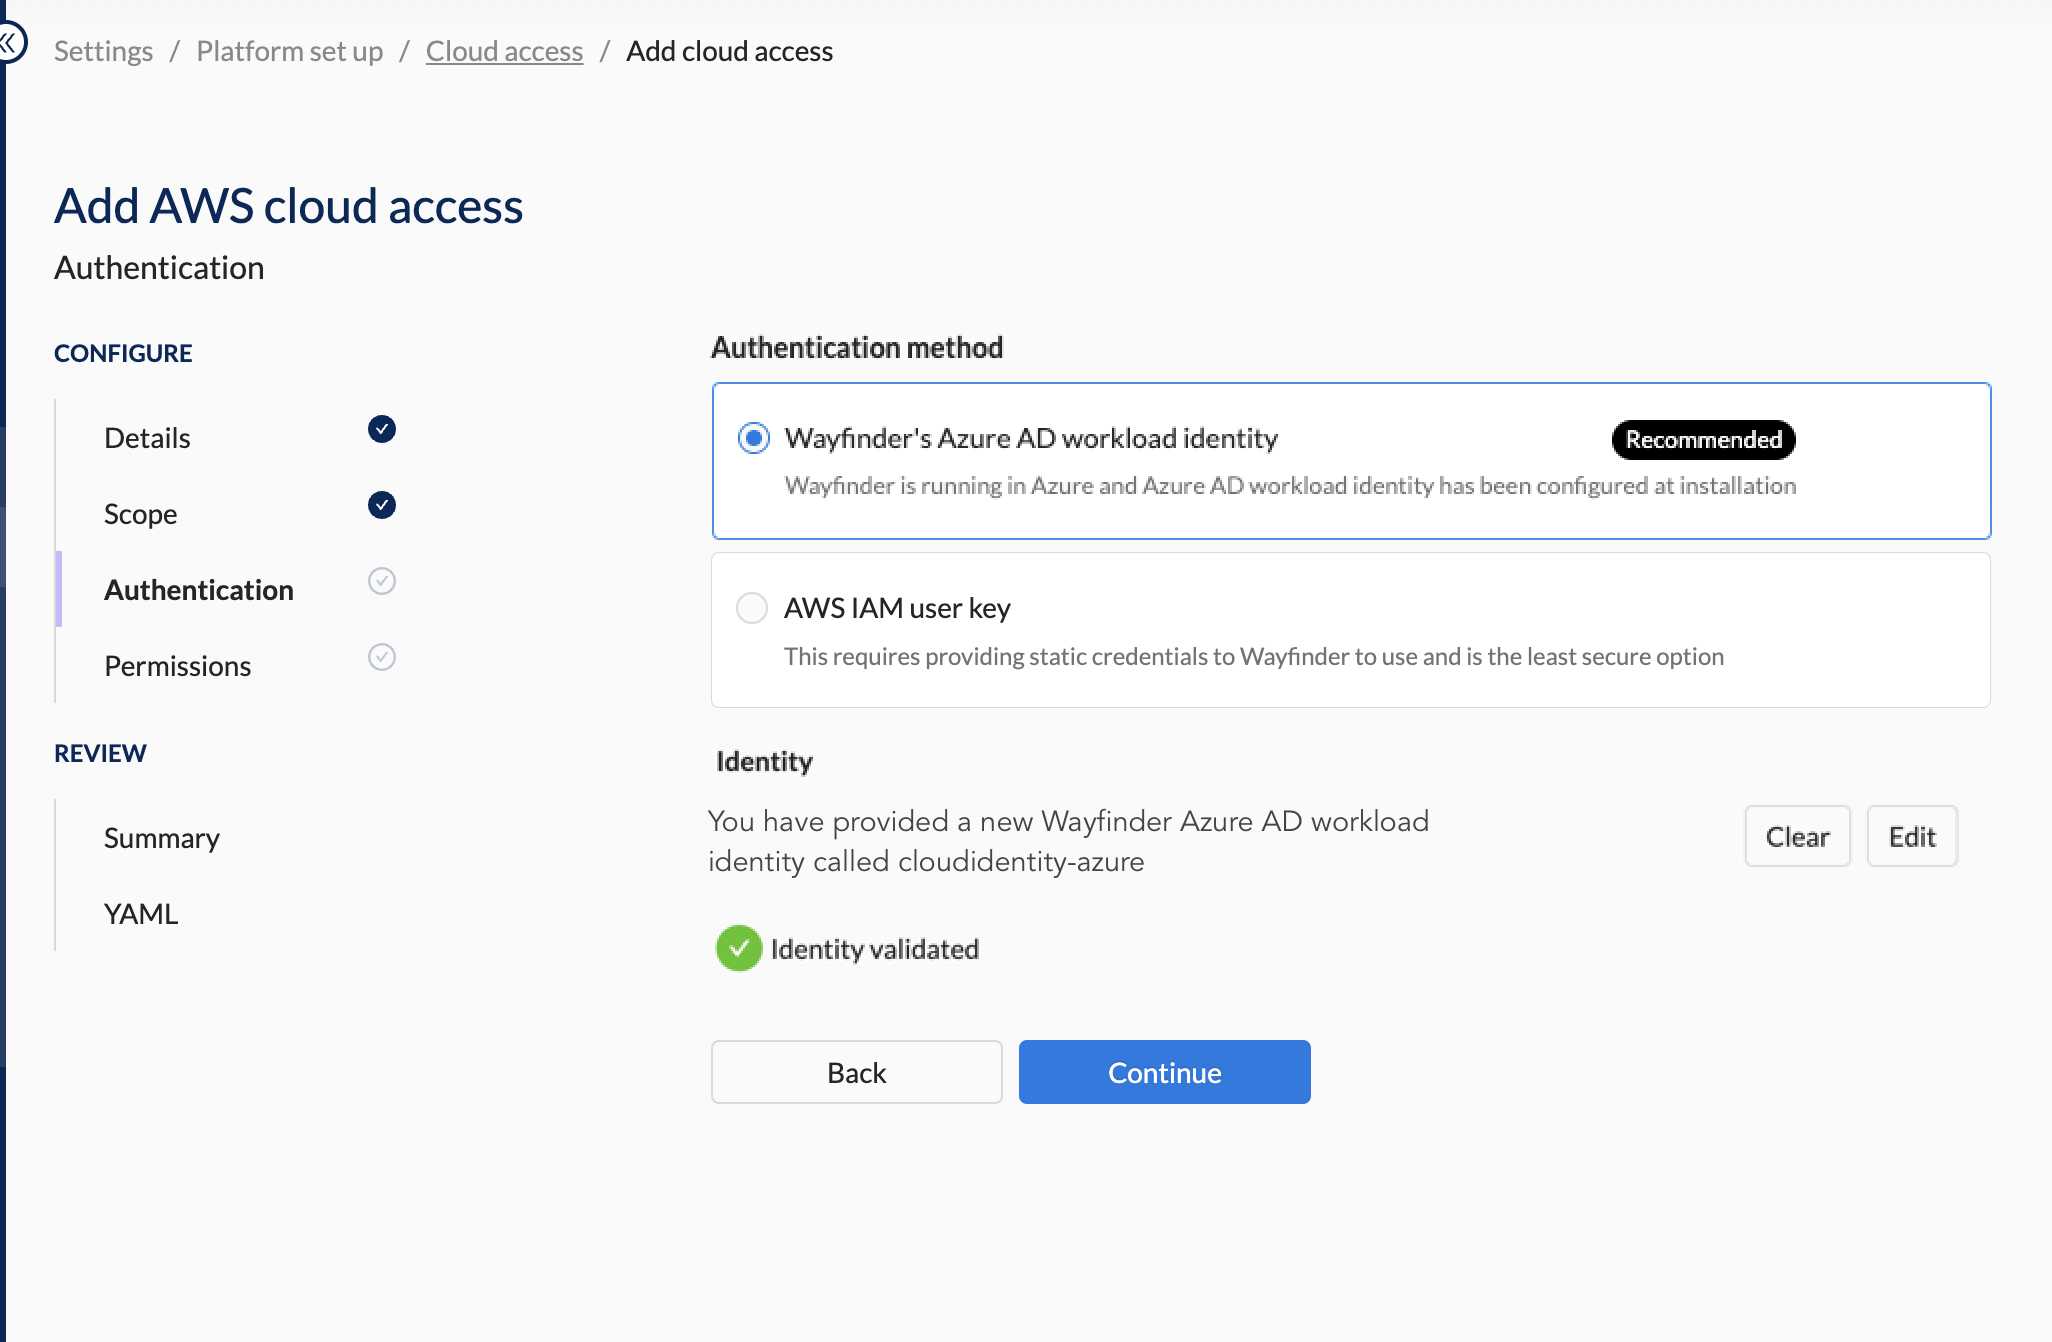
- You will see a green tick mark that confirms that validate passed.
| Field | Description |
|---|---|
| -- Name | Name of the new cloud identity |
| -- Cloud | The cloud in which the identity will be created (read-only value). Value(s): - Azure |
| -- Type | The type of identity to create. Option(s): - Wayfinder's AD Workload Identity (Read-only value) |
| -- Tenant ID | Specify the value for the Tenant ID for the new identity |
| -- Client ID | Specify the value for the Client ID |
| -- Validate (button) | Validates that Wayfinder can use that cloud identity |
Example
Fill in the details.
You can proceed once all the validation passed.
Permissions Section Properties
This section specifies the properties that grants the necessary permissions to Wayfinder. These permissions allow Wayfinder to create, manage and update cloud resources in the cloud account you specified in the previous section.
| Field | Description |
|---|---|
| Cluster manager | Permissions that create and manage EKS Kubernetes clusters. |
| - AWS IAM role ARN | The value of the identity that has the needed permissions assigned. - AWS: Specify the ARN of the IAM Role in the AWS account that you're adding and that you've configured (manually or using Wayfinder's terraform module) with the cluster management permissions. |
| - Necessary Permissions | JSON outlining the needed permissions for Cluster Manager. |
| - Validate (button) | Verification that the needed permissions were assigned correctly. |
| DNS management | Permissions that create and manage Route53 DNS Zones for automated DNS management. |
| - AWS IAM role ARN | The value of the identity that has the needed permissions assigned. - AWS: Specify the ARN of the IAM Role in the AWS account that you're adding and that you've configured (manually or using Wayfinder's terraform module) with the DNS management permissions. |
| - Permissions | JSON outlining the needed permissions to manage the DNS records on a sub domain of your global DNS entry. |
| - Validate (button) | Verification that the needed permissions were assigned correctly. |
| Network management | Permissions that create and manage VPC for EKS clusters. |
| - AWS IAM role ARN | The value of the identity that has the needed permissions assigned. - AWS: Specify the ARN of the IAM Role in the AWS account that you're adding and that you've configured (manually or using Wayfinder's terraform module) with the Network management permissions |
| - Permissions | JSON outlining the needed permissions. |
| - Validate (button) | Verification that the needed permissions were assigned correctly. |
Summary Section Properties
Wayfinder provides you with a summary of the configuration details you've entered.
You will not be able to apply the configuration if any of the validations failed.
YAML Section Properties
You will be presented with the manifest (yaml) files for the configuration details you entered.
You have the option to apply the configuration immediately by clicking the Apply button, or to download the YAML so that you can apply it later using Wayfinder's CLI or your CI system.
The following YAML files are produced:
Workspace
Only shown when you create a new workspace.
apiVersion: org.appvia.io/v2beta1
kind: Workspace
metadata:
  name: sand
spec:
  description: sandbox
  key: sand
  summary: sandbox for dev
  resourceNamespace: ''
Stage
Only shown when you create a new stage.
apiVersion: org.appvia.io/v2beta1
kind: Stage
metadata:
  name: nonprod
spec:
  displayName: nonprod
  description: non production stage for dev
Cloud Access Configuration
The type of manifest depends on the Access Type you've selected.
- Provisioning
- DNS Zone Management
- Network Peering
- Cost Estimates
apiVersion: cloudaccess.appvia.io/v2beta2
kind: CloudAccessConfig
metadata:
  name: aws-dev3
spec:
  cloudIdentityRef:
    cloud: azure               <-- Cloud Wayfinder is connecting from
    name: cloudidentity-azure  <-- Identity Wayfinder is connecting with
  aws:
    account: "812345678901"    <-- The AWS Account ID that you're connecting to
    defaultRegion: eu-west-2   <-- The default region you selected
  type: Provisioning           <-- Note the type
  permissions:
  - awsRole: arn:aws:iam::812345678901:role/wf-ClusterManager2023202323   <-- The ARN that the terraform module returned
    permission: ClusterManager
  - awsRole: arn:aws:iam::812345678901:role/wf-DNSZoneManager2023202323   <-- The ARN that the terraform module returned
    permission: DNSZoneManager
  - awsRole: arn:aws:iam::812345678901:role/wf-NetworkManager2023202323   <-- The ARN that the terraform module returned
    permission: NetworkManager
  stage: nonprod
apiVersion: cloudaccess.appvia.io/v2beta2
kind: CloudAccessConfig
metadata:
  name: aws-dev3
spec:
  cloudIdentityRef:
    cloud: azure               <-- Cloud Wayfinder is connecting from
    name: cloudidentity-azure  <-- Identity Wayfinder is connecting with
  aws:
    account: "812345678901"    <-- The AWS Account ID that you're connecting to
    defaultRegion: eu-west-2   <-- The default region you selected
  type: DNSZoneManagement      <-- Note the type
  permissions:
  - awsRole: arn:aws:iam::812345678901:role/wf-DNSZoneManager2023202323   <-- The ARN that the terraform module returned
    permission: DNSZoneManager
  stage: nonprod
apiVersion: cloudaccess.appvia.io/v2beta2
kind: CloudAccessConfig
metadata:
  name: aws-dev3
spec:
  cloudIdentityRef:
    cloud: azure               <-- Cloud Wayfinder is connecting from
    name: cloudidentity-azure  <-- Identity Wayfinder is connecting with
  aws:
    account: "812345678901"    <-- The AWS Account ID that you're connecting to
    defaultRegion: eu-west-2   <-- The default region you selected
  type: NetworkPeering         <-- Note the type
  permissions:
  - awsRole: arn:aws:iam::812345678901:role/wf-NetworkManager2023202323   <-- The ARN that the terraform module returned
    permission: NetworkManager
  stage: nonprod
apiVersion: cloudaccess.appvia.io/v2beta2
kind: CloudAccessConfig
metadata:
  name: aws-dev3
spec:
  cloudIdentityRef:
    cloud: azure               <-- Cloud Wayfinder is connecting from
    name: cloudidentity-azure  <-- Identity Wayfinder is connecting with
  aws:
    account: "812345678901"    <-- The AWS Account ID that you're connecting to
    defaultRegion: eu-west-2   <-- The default region you selected
  type: CostsEstimates         <-- Note the type
  permissions:
  - awsRole: arn:aws:iam::812345678901:role/wf-CloudInfo2023202323   <-- The ARN that the terraform module returned
    permission: CloudInfo
  stage: nonprod
View Cloud Access Configurations
Use the wf get cloudaccessconfig CLI command to view a list of cloud access configurations. Use the --cloud flag to limit the results to the specified cloud provider and the -w flag to specify the workspace.
wf get cloudaccessconfig --cloud aws -w sand
NAME           PROVIDER    STATUS            IDENTIFIER    AGE
aws-dev3       aws         Success           Unknown       55m
aws-nonprod    aws         ActionRequired    Unknown       19d
aws-prod       aws         ActionRequired    Unknown       19d
Use the -o yaml flag to output the cloud access configuration details to the console.
wf get cloudaccessconfig aws-dev3 -o yaml
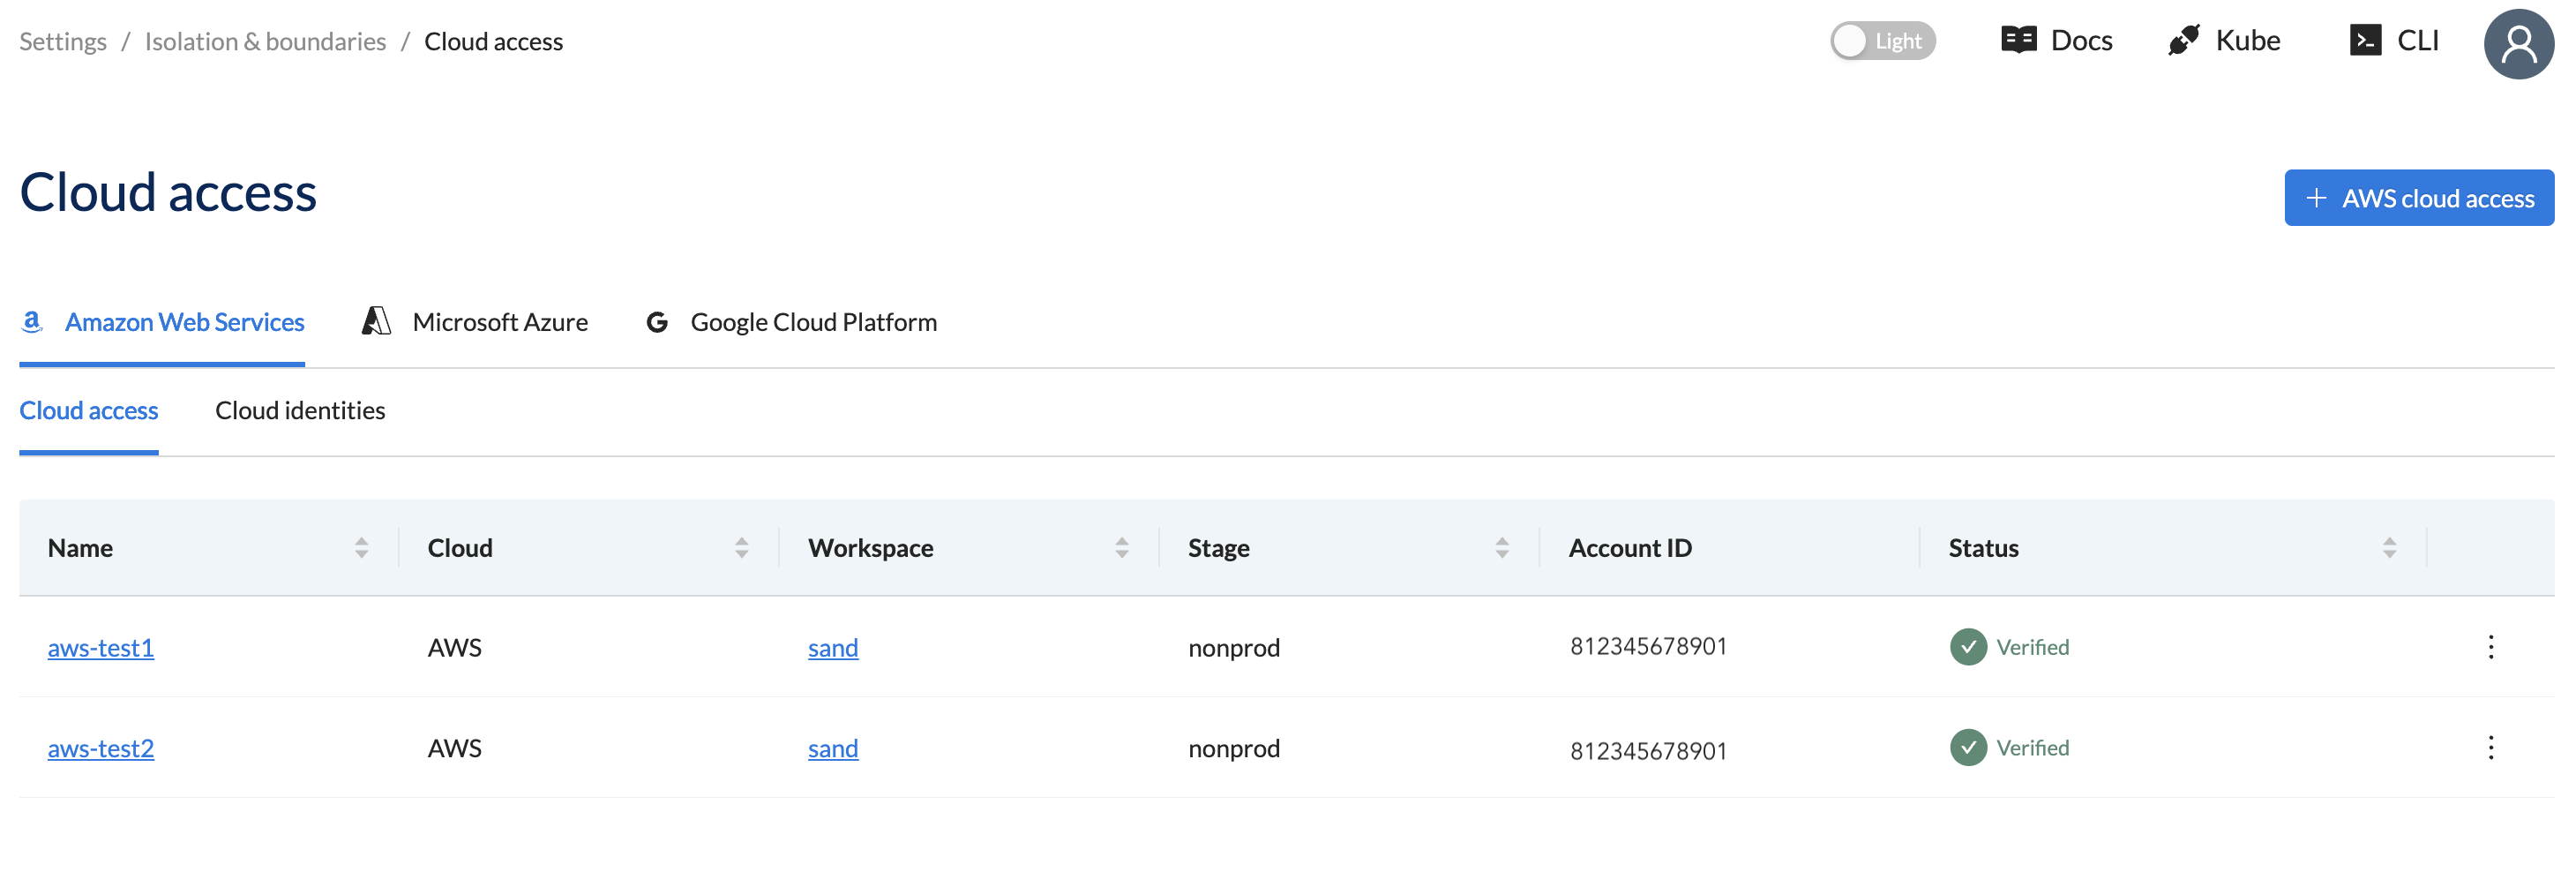
Using Wayfinder's web interface:
- Select Admin, then navigate to Cloud > Access
- Select your cloud provider, for example Amazon Web Services
- The Cloud Access lists all the Cloud Access configurations for the selected cloud provider
Create a Cloud Access Configuration using CLI
[ADVANCED USERS]
Use the wf create cloudaccessconfig command to create a cloud access configuration using the CLI. Follow the CLI prompts or use the --help flag for a full list of options. You need to configure the target account manually or use Wayfinder's terraform module.
If you need more guidance then see the quick start section.
Edit & Apply Cloud Access Configurations
Output the cloud access configuration to file using the wf get cloudaccessconfigNAME-OF-CONFIG command with the > FILENAME.yaml postfix.
wf get cloudaccessconfig aws-dev3 > ./manifests/aws-dev3.yaml
Update the file as needed and use wf apply command with the -f PATH-TO-FILE.yaml flag to apply the changes.
wf apply cloudaccessconfig -f ./manifests/aws-dev3.yaml
Using Wayfinder's web interface:
- Select Admin, then navigate to Cloud > Access
- Select your cloud provider, for example Amazon Web Services
- The Cloud Access lists all the Cloud Access configurations for the selected cloud provider
- Click on the name of the Cloud Access to open the form in Edit mode.
- Update as needed.
You will not be able to change the values of the fields below. If they need changing then you need to create a new cloud access configuration.
- Name
- Account ID
- Access Type
All validations need to pass before you can re-apply the configuration.
View Permissions
These are the permissions that Wayfinder need in the target account to create and manage cloud resources.
Use the wf get cloudpermissions CLI command to view a list of available cloud permissions.
wf get cloudpermissions
NAME              WAYFINDER FUNCTIONALITY SET    DESCRIPTION
ClusterManager    Provisioning                   Used for managing cluster provisioning inside the child account
DNSZoneManager    Provisioning                   Used for managing application DNS records on a sub domain of the Global DNS entry
NetworkManager    Provisioning                   Used for managing network permissions inside the child account
DNSZoneManager    DNSZoneManagement              Used to create sub domains for workspace clusters inside of the imported top-level domain
NetworkManager    NetworkPeering                 Accepts peering requests in an external VPC network to provide end-to-end peering automation
CloudInfo         CostsEstimates                 Used to retrieve cost data for infrastructure cost estimation
Use the wf describe cloudpermissions CLI command to view the JSON of the specified permission.
Also see the Permisisons Section section.
wf describe cloudpermission DNSZoneManager -c aws -o json
Permission: DNSZoneManager
Description: Used for managing application DNS records on a sub domain of the Global DNS entry
Permissions:
- actions:
  - iam:SimulatePrincipalPolicy
  condition: ""
  effect: Allow
  resource: '*'
- actions:
  - route53:ListHostedZones
  - route53:GetHostedZone
  - route53:CreateHostedZone
  - route53:DeleteHostedZone
  - route53:ChangeTagsForResource
  - route53:ListResourceRecordSets
  - route53:ChangeResourceRecordSets
  - route53:ListTagsForResource
  condition: ""
  effect: Allow
  resource: '*'
- actions:
  - sts:GetCallerIdentity
  condition: ""
  effect: Allow
  resource: '*'
- actions:
  - iam:GetRole
  - iam:CreateRole
  - iam:TagRole
  - iam:UpdateRoleDescription
  - iam:UpdateAssumeRolePolicy
  - iam:DeleteRolePolicy
  - iam:PutRolePolicy
  condition: ""
  effect: Allow
  resource: '*'
Using Wayfinder's web interface:
-
Select Admin, then navigate to Cloud > Access
-
Select your cloud provider, for example Amazon Web Services
-
The Cloud Access lists all the Cloud Access configurations for the selected cloud provider
-
Click on the name of the Cloud Access to open the form in Edit mode.
-
Navigate to the Permissions section.
-
Click on the Configure button.
-
The JSON outlining the permissions are displayed. Also see the Permisisons Section section.