Managing Multi-Tenant Clusters
You can share a cluster so that various development teams can self serve new namespaces on that cluster, without having access to manage the cluster. This provides a way to achieve workload isolation whilst saving the cost of creating a new cluster. A cluster shared in this way is called a multi-tenant cluster.
Multi-tenancy in Wayfinder means multiple workspaces can share a single cluster as tenants. Tenants can manage their own namespaces in the shared cluster, but cannot access cluster-wide resources. Wayfinder comes pre-configured with RBAC that models common ways of working with multi-tenant clusters, and provides tools to let you set up guardrails for what tenants can do in your cluster. You can manage access, security, and fair allocation of cluster resources.
See also:
Recommended scenarios for multi-tenancy
Wayfinder provides hard multi-tenancy in that it isolates tenant namespaces so that no tenant can access another tenant's namespace or resources. Multi-tenant clusters have sensible default security policies and RBAC in place to increase isolation between tenant namespaces.
We recommend you use multi-tenant clusters for development/non-production environments, where there is some trust between workspaces. However, for production environments with zero trust single-tenancy provides the best security and isolation.
How multi-tenancy works
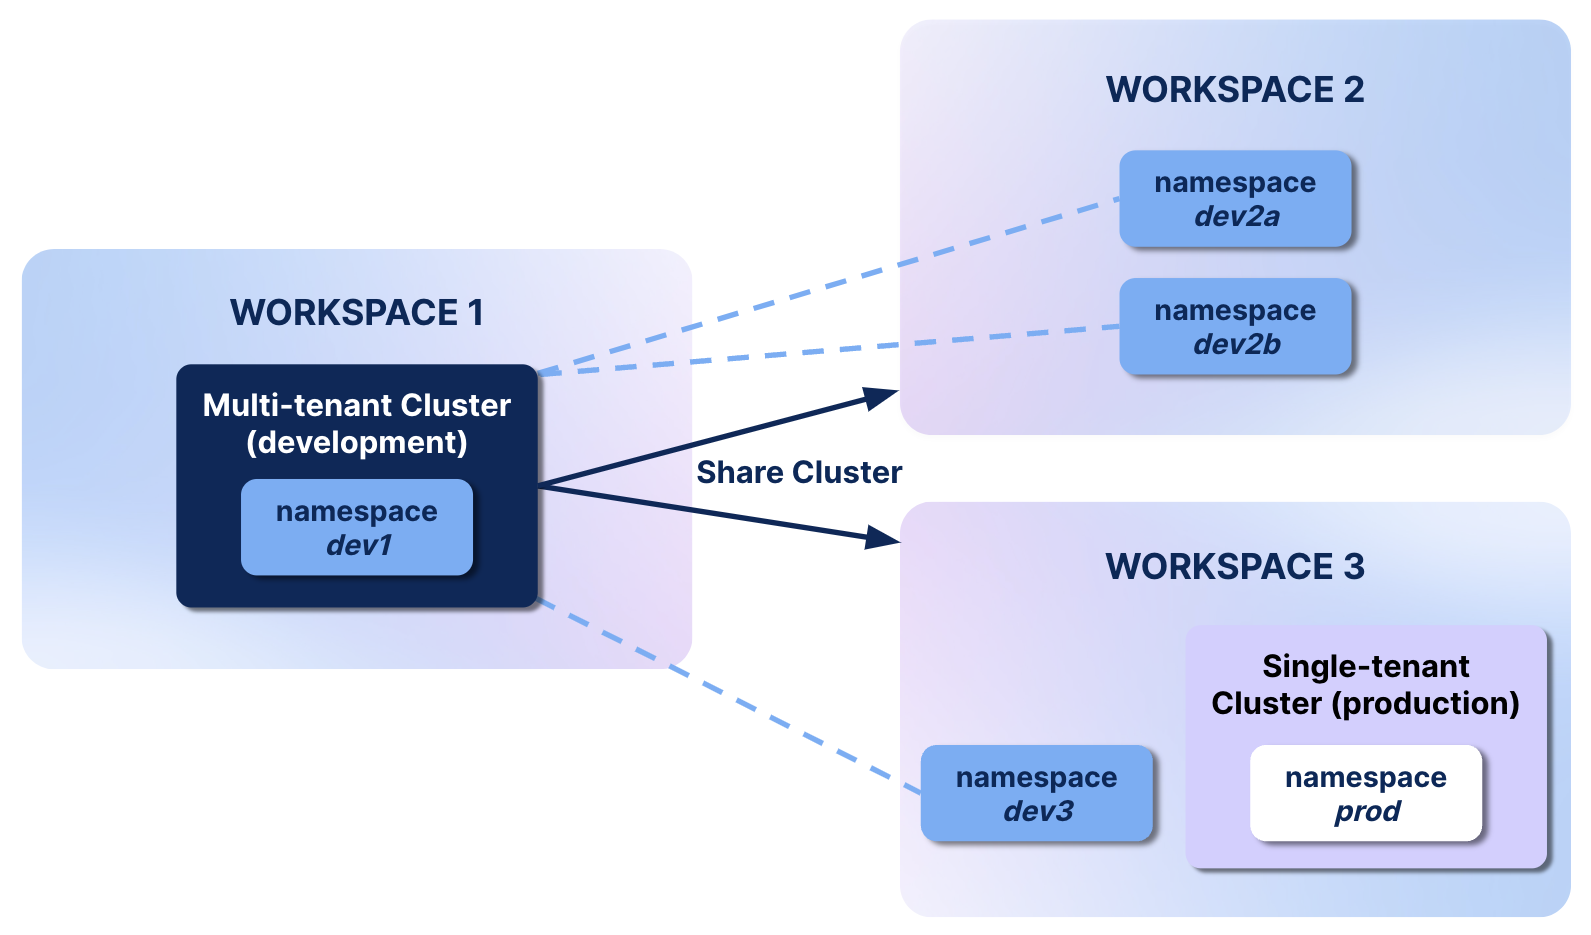
As a cluster owner, you can set the cluster to be multi-tenant, and then share it by allocating tenancy to one or more workspaces, or all of them. The tenant workspaces can then create namespaces on your cluster, but cannot access cluster-wide resources.
In the diagram below:
- Workspace 1 has shared a multi-tenant cluster for development with Workspaces 2 and 3. They are now tenants of this cluster.
- The tenant workspaces can create and administer their own namespaces on the multi-tenant cluster, but cannot access other tenants' namespaces.
- Workspace 2 doesn't have its own cluster, but has tenant namespaces.
- Workspace 3 has a tenant namespace, but also has its own single-tenant cluster for production.

Workspace user permissions for a multi-tenant cluster
With a multi-tenant cluster, users can do different things depending on whether they are members of the cluster owning workspace or the tenant workspace. Here's a summary of these differences:
| User's role | In the cluster owning workspace | In the cluster tenant workspace |
|---|---|---|
| Cluster creator (Workspace owner or member) | I have cluster admin rights and can:
| NA |
| Workspace Owner | I can:
| I can:
|
| Workspace Member | I can:
| I can:
|
Namespaces created by a cluster tenant can only be modified by the tenant and the Wayfinder administrator.
Set resource quotas and constraints
It's important to set guardrails for tenants of your multi-tenant cluster before sharing the cluster with other workspaces. As the owner of a shared cluster you can set resource constraints (quotas and limit ranges) for tenant namespaces, so that no namespace uses more than its fair share of resources.
The Wayfinder administrator can include these constraints on the cluster plan by creating quota templates for various sizes of quotas and limits. The Wayfinder administrator might not allow workspaces to edit the cluster plan templates when creating clusters, but workspaces can add more templates if needed.
When you set or change the resource constraints, the new settings apply to new namespaces, but not to existing ones.
Constraints and defaults you can set in Wayfinder
| Resource quotas | You can configure quotas for resource requests for a namespace. These limit the sum total of requests allowed for all containers in the namespace. |
| Limit ranges | You can configure maximum values that can be used by any pod and/or any container in a namespace. |
| Defaults | You can set resource defaults for containers. These are used when deployed containers don't specify their own default requests and limits. |
For more information on how quotas and limit ranges work, explore these Kubernetes topics:
- Resource Quotas – General information
- Limit Ranges – General information
- Manage Resources – Links to topics on configuring constraints for specific resources
Set resource constraints for tenants
These resource constraints apply only to tenant namespaces, not namespaces created by the cluster owning workspace.
To set resource constraints for tenant namespaces:
-
In Wayfinder's web interface, select Admin > Kubernetes > Clusters page, click the name of a cluster.
-
Click the Settings tab, then click Edit.
These settings are also available in Advanced settings if you're creating the cluster.
-
Scroll down to Multi-tenancy and switch the Enable quota limits toggle to enabled.
You may see resource quota templates provided by your cluster plan. These templates will be available to namespace creators on a multi-tenant cluster. The Wayfinder administrator may allow you to edit the existing templates, but you can add new ones.
-
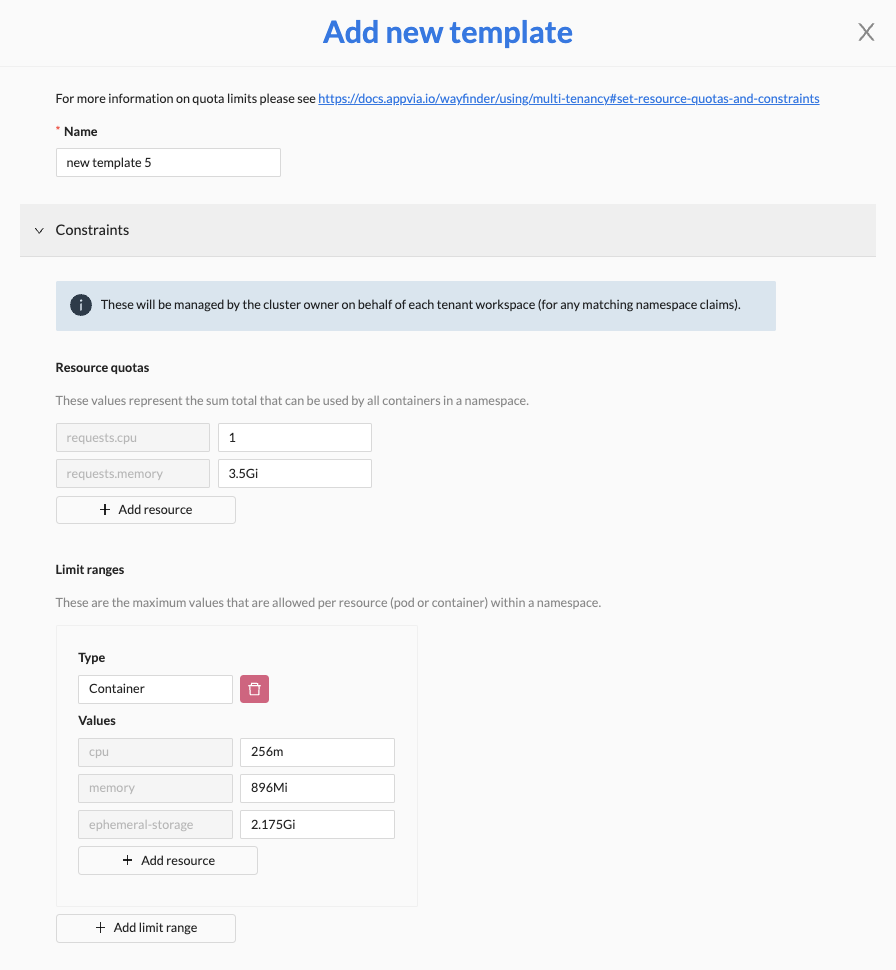
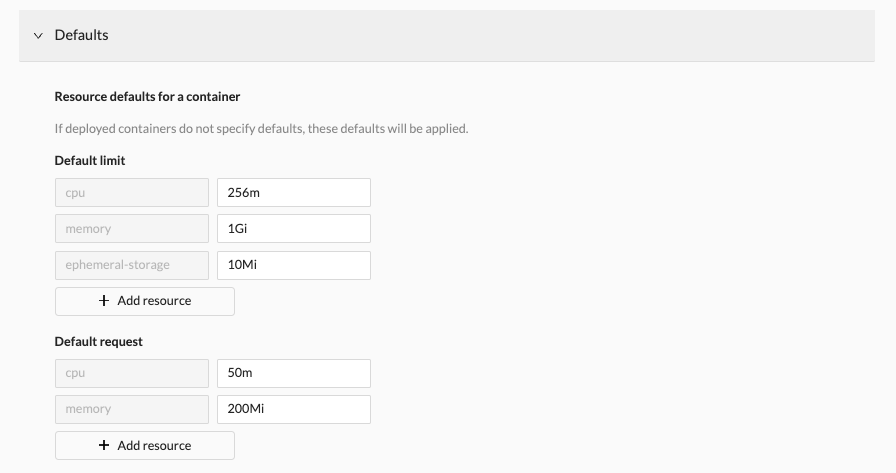
To add a quota limits template, click Add template, and then adjust the values in the Constraints and Defaults sections as needed.
Constraints section

- Resource quotas: Enter request quotas that apply to the namespace as a whole. A request quota is in the format request.resource, for example
request.cpu. - Limit ranges: Enter the maximum resources that can be used by any pod and/or any container in a namespace. For each resource enter a name, for example
cpu, and a value. Each limit range set here must have associated defaults on the Defaults tab–see Note below.
Defaults section
When you set these, if a deployed container does not specify its own values for limits and requests, these defaults are used.
noteFor any container or pod Limit ranges you set on the Constraints section, you must have associated default limits and requests on the Defaults section.
For example, if you set limit ranges per pod or container for cpu, memory, and ephemeral storage on the Constraints section, you must set default requests and limits per container for cpu, memory, and ephemeral storage on the Defaults section, keeping in mind that there may be multiple containers in a pod.

- Resource quotas: Enter request quotas that apply to the namespace as a whole. A request quota is in the format request.resource, for example
Configure a cluster for multi-tenancy
Be sure to set up guardrails for tenants before configuring your cluster for multi-tenancy.
A cluster is created with single tenancy by default. You can configure a cluster to be multi-tenant after it is created. There are two options for configuring multi-tenancy:
- Global multi-tenancy – Any workspace can create a new namespace in the cluster.
- Managed multi-tenancy – Selected workspaces can create a new namespace in the cluster.
If you decide to stop the creation of new tenant namespaces, you can go back to single-tenancy without affecting existing tenant namespaces.
To configure a cluster for multi-tenancy:
- Ensure that you have set guardrails for tenants of this cluster.
- In Wayfinder's web interface, select Admin > Kubernetes > Clusters page, click the name of a cluster that you want to configure.
- Click the Tenancy (Single) tab, then click Edit.

-
Select the type of tenancy: Global or Managed.
If you select Managed, also select the workspace(s) you want as tenants in the Allocated workspaces field.
View or edit workspaces that are tenants of my cluster
In the cluster details page, the Tenancy (Type) tab indicates how the cluster is configured for tenancy:
- Tenancy (Single) – not shared
- Tenancy (Global) – shared with all workspaces
- Tenancy (Managed) – shared with specific workspaces
If the tenancy type is Managed, you can see which workspaces the cluster has been shared to as follows.
To view tenant workspaces on a multi-tenant cluster:
-
In the Wayfinder UI, navigate to Resources > Clusters, and then click the name of the cluster.
-
Click the Tenancy (Managed) tab.
Workspaces that share this cluster are listed at the bottom in Allocated workspaces.
Here you can:
- Edit the workspaces that share the cluster.
- Switch to another type of tenancy (Single, Global, or Managed).
Disable multi-tenancy for new namespaces
If your cluster is multi-tenant, and you want to prevent creation of new tenant namespaces, follow the procedure above and select Single tenancy in the Tenancy tab.
This will not affect existing tenant namespaces on this cluster.
Edit quotas and limits on behalf of a tenant
Once tenants of your cluster create namespaces, tenants may request more resources, or you may need to change their quotas and limits. In that case, you can edit these on behalf of a tenant.
Quotas and limits do not apply to namespaces created by the cluster owning workspace.
To edit quotas and limits on tenant namespaces:
-
In Wayfinder's web interface, select Admin > Kubernetes > Clusters page, click the name of the cluster where the tenant namespace resides.
-
Find and expand the tenant namespace you want to edit, and then click the Quotas & limits tab.
This tab is only available on tenant namespaces.
-
Click Edit quota Limits and/or Edit limit ranges, complete your edits, and then click Save.
Create a namespace as a tenant
You can create and manage namespaces as a tenant of a shared cluster, but you cannot access cluster resources.
View clusters shared with a workspace
Clusters shared to a workspace appear on the clusters list on the Admin > Kubernetes > Clusters page.
For each cluster, the list shows the following key columns.
-
Cluster stage – When creating a namespace as a tenant, check the stage to determine if this cluster is set up for the development stage you need, for example, prod or non-prod.
-
Tenancy – Can have these values:
- Tenant – The workspace is a tenant of this cluster.
- Single - The workspace owns this single-tenant cluster.
- Multi - The workspace owns this multi-tenant cluster.
-
Owning workspace – If the owning workspace is not your own, then that workspace lets you be a tenant on this cluster, and the Tenancy column shows Tenant.
Create a namespace in a shared cluster
You can create namespaces as a tenant of a cluster that's been shared to your workspace. If you are a tenant of a cluster, the cluster details page only displays the namespaces owned by your workspace on that cluster. You do not see namespaces created by other workspaces.
Before creating a namespace as a tenant, check the Cluster stage column on your cluster list to make sure the cluster is set up for the development stage you need.
To create a namespace as a tenant:
-
In Wayfinder's web interface, select Admin > Kubernetes > Clusters page, click the name of the cluster where you want to create the namespace.
-
Select the Namespaces tab
The current Namespaces are displayed.
-
Click the Add namespace button.
-
Enter a Namespace name.
-
Select a Quota limit option, and then click Save.
The available options are preset resource constraints provided by the cluster administrator.
Access a namespace in a shared cluster
Once you create a namespace as a tenant in a shared cluster, you must access the namesapce and assume a role to manage your namespace. You can assume roles up to namespace.admin. However, you cannot access cluster-wide resources.
To access a namespace you created as a tenant:
-
Run this command to change your
kubctlcontext to the shared cluster, and assume a role (for examplenamespace.admin):wf access cluster CLUSTERNAME NAMESPACENAME --role ROLENAMEFor example:
wf access cluster dt-multitentant lego --role namespace.adminIn this example, the cluster
dt-multitenanthas been shared with your workspace, you have created a namespace calledlego, and you are assuming the role ofnamespace.adminon this namespace.
View quota limits on your namespace
As a tenant, you can see the namespace quota limits sets by the cluster owner.
To view your quota limits as a tenant:
-
In Wayfinder's web interface, select Admin > Kubernetes > Clusters page, click the name of the cluster where you're a tenant.
-
Find and expand the tenant namespace you want, and then click the Quotas & limits tab.
The resource quotas and limit ranges currently in effect are displayed. This tab is only available on tenant namespaces.