Components
Components are individually deployable parts of your application. They can be of type container or of type cloud resource. When creating container components, you have the option to either use your existing deployment manifests or let Wayfinder generate them based on your provided settings.
Each type of component is described in the sections that follow.
You must create an Application before you can create and define components.
CLI Quick Reference
| Instruction | CLI Command |
|---|---|
| View a list of components | wf get appcomponent |
| View a component's manifest | wf get appcomponent COMPONENT-NAME -o yaml |
| Create a container component | wf create appcomponent COMPONENT-NAME --app APP-NAME --type component --image IMAGE -w WORKSPACE |
| Create a container component (using your existing manifests) | wf create appcomponent COMPONENT-NAME --app APP-NAME --type OwnManifests -w WORKSPACE |
| Create a cloud resource component | wf create appcomponent COMPONENT-NAME --app APP-NAME --type cloudresource -w WORKSPACE --plan CLOUD-RESOURCE-PLAN --plan-version SEMVER |
| Deploy a component | wf deploy appcomponent APP-NAME ENV-NAME --component COMPONENT-NAME -w WORKSPACE |
| View a component's manifest (without deploying) | wf deploy appcomponent APP-NAME ENV-NAME --component COMPONENT-NAME --dry-run |
| Export an existing component's manifest to a file | wf get appcomponent COMPONENT-NAME -o yaml > FILENAME.yaml |
| Apply a component's manifest | wf apply -f PATH-TO-FILE.yaml |
| Access your environment before you create a secret | wf access env APP-NAME ENV-NAME |
| Create a Kubernetes secrets using kubectl | kubectl create secret generic SECRET-NAME --from-literal=KEY=VALUE |
Container Components
Container components define a concise set of properties for Kubernetes deployment management, including a list of containers that will be created within the pods.
If you already have deployment manifests for your container components, use the --type OwnManifests flag to inform Wayfinder about
them. Alternatively, Wayfinder can create them for you based on the details you provide through Wayfinder's web interface or by using
the --type component flag. Subsequently, you can preview your deployment manifests using the --dry-run flag and deploy them using the wf deploy command.
View Container Components
Use the wf get appcomponent command to view a list of components. The TYPE column will have a value of Container for a container component,
CloudResource for a cloud resource component, and OwnManifests for a container component where you indicated that you wanted to use your
existing Kubernetes deployment manifests.
wf get appcomponent

NAME                         APPLICATION        COMPONENT NAME    TYPE             AGE
cideploy-backend             cideploy           backend           Container        26h
cideploy-database            cideploy           database          Container        26h
coolapps2-front-end          coolapps2          front-end         Container        43m
coolapps2-storage            coolapps2          storage           CloudResource    4m12s
coolapps2-backend2           coolapps2          backend2          OwnManifests     9m15s
Use the wf get appcomponent COMPONENT-NAME -o yaml command to view the manifest details of a specific component. You must use the fully qualified
name e.g., APPLICATION-COMPONENT.
wf get appcomponent coolapps2-front-end -o yaml

apiVersion: app.appvia.io/v2beta1
kind: AppComponent
metadata:
  labels:
    appvia.io/app: coolapps2
    appvia.io/name: front-end
  name: coolapps2-front-end
  namespace: ws-sand
spec:
  application: coolapps2
  container:
    containers:
    - args:
      - echo "it works"
      command:
      - /bin/sh
      env:
      - name: APP_STAGE
        value: non-prod
      - fromSecret:
          key: secret-key
          name: my-secret
        name: APP_SECRET
      - fromCloudResourceOutput:
          componentName: storage
          output: PRIMARY_ACCESS_KEY
        name: APP_DEPENDENCY
      image: ghcr.io/organization-name/repo:latest
      name: front-end-1
      ports:
      - containerPort: 8080
        expose: true
        name: front-end-prt
        protocol: TCP
      securityContext:
        runAsGroup: 6544
        runAsUser: 6543
    expose:
      container: front-end-1
      port: 8080
    replicas: 1
    tls: true
  dependsOn:
  - storage
  key: fronten
  name: front-end
  type: Container
In Wayfinder's web interface:
- Click Workspaces > All Applications, then select the name of your application
- All your components will be listed under Component definitions
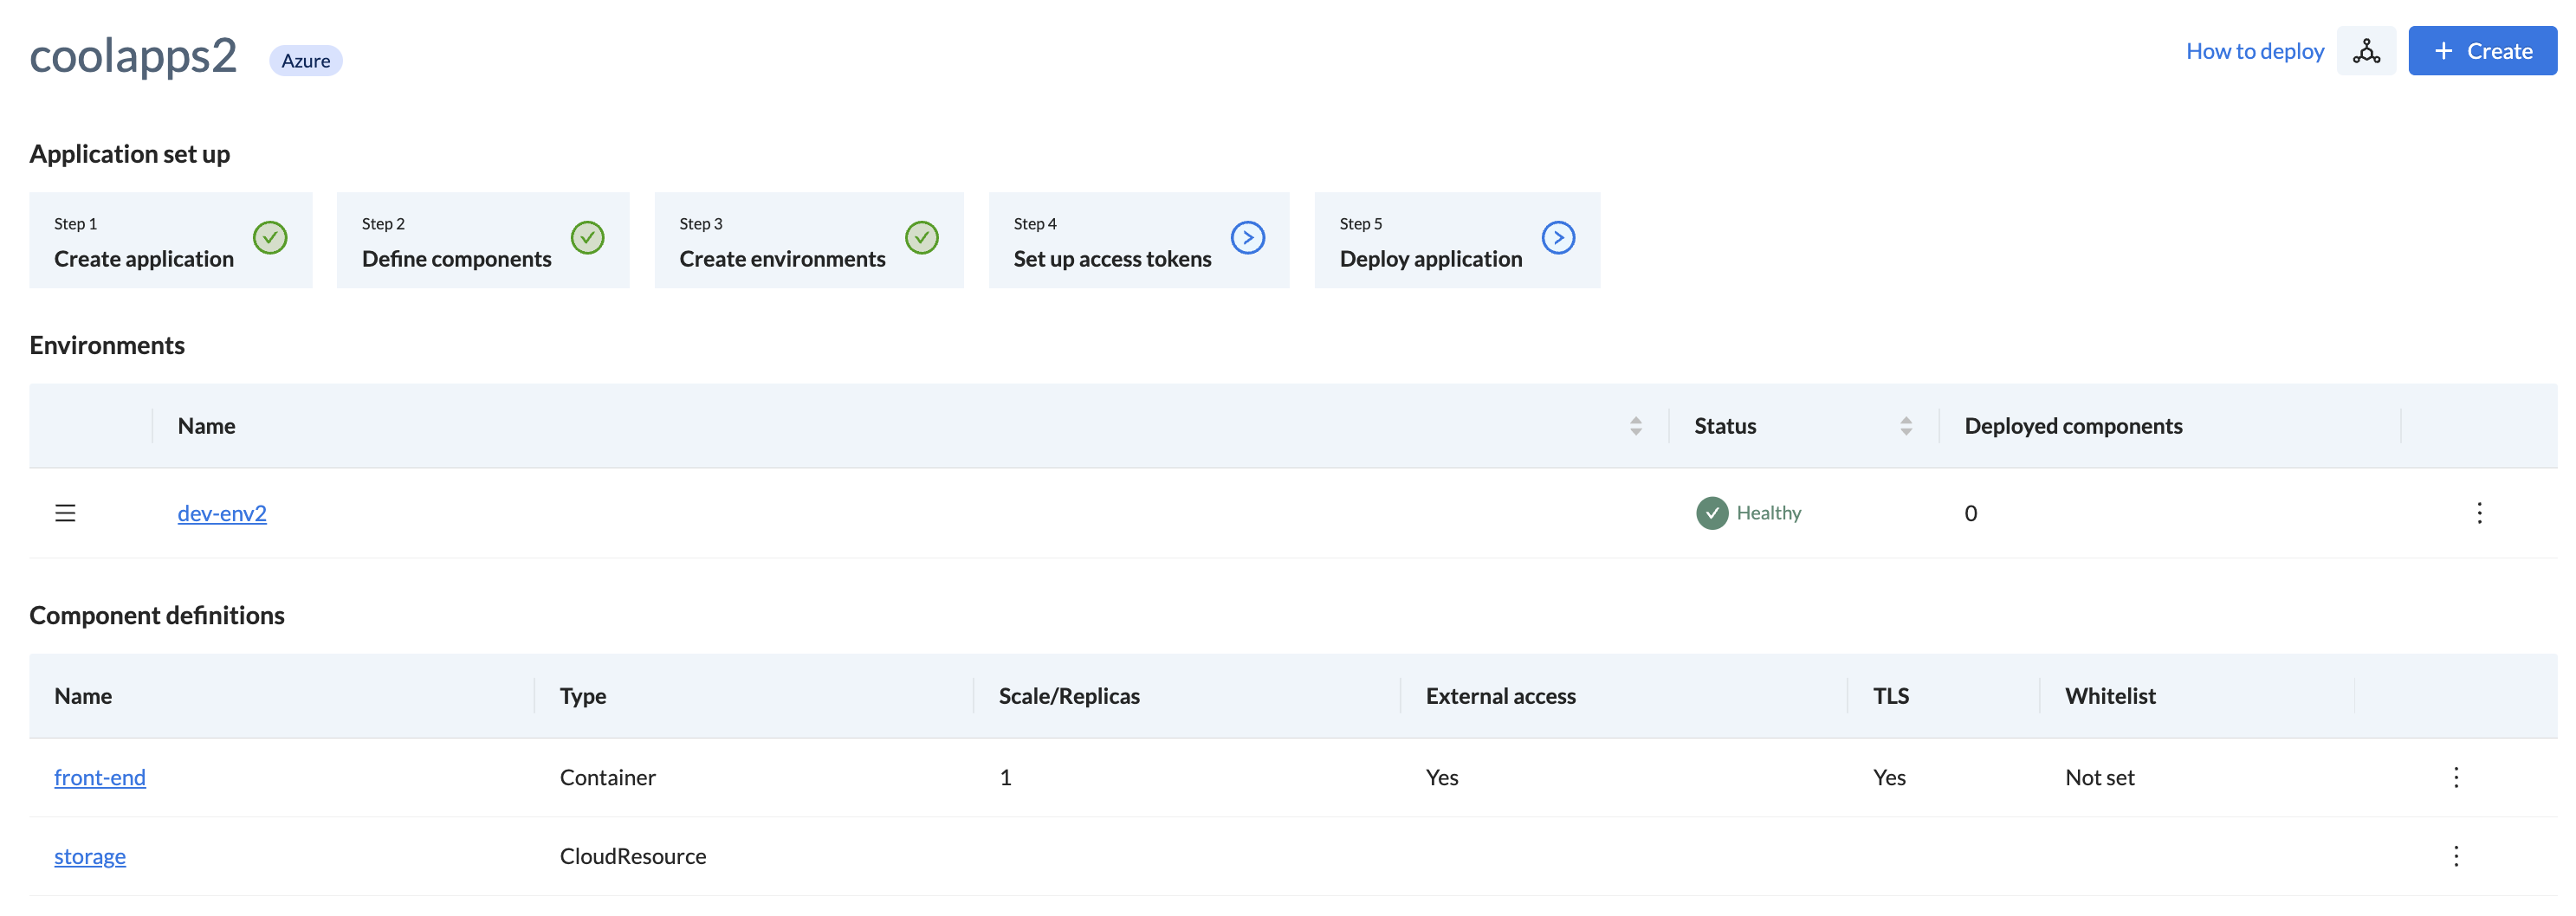
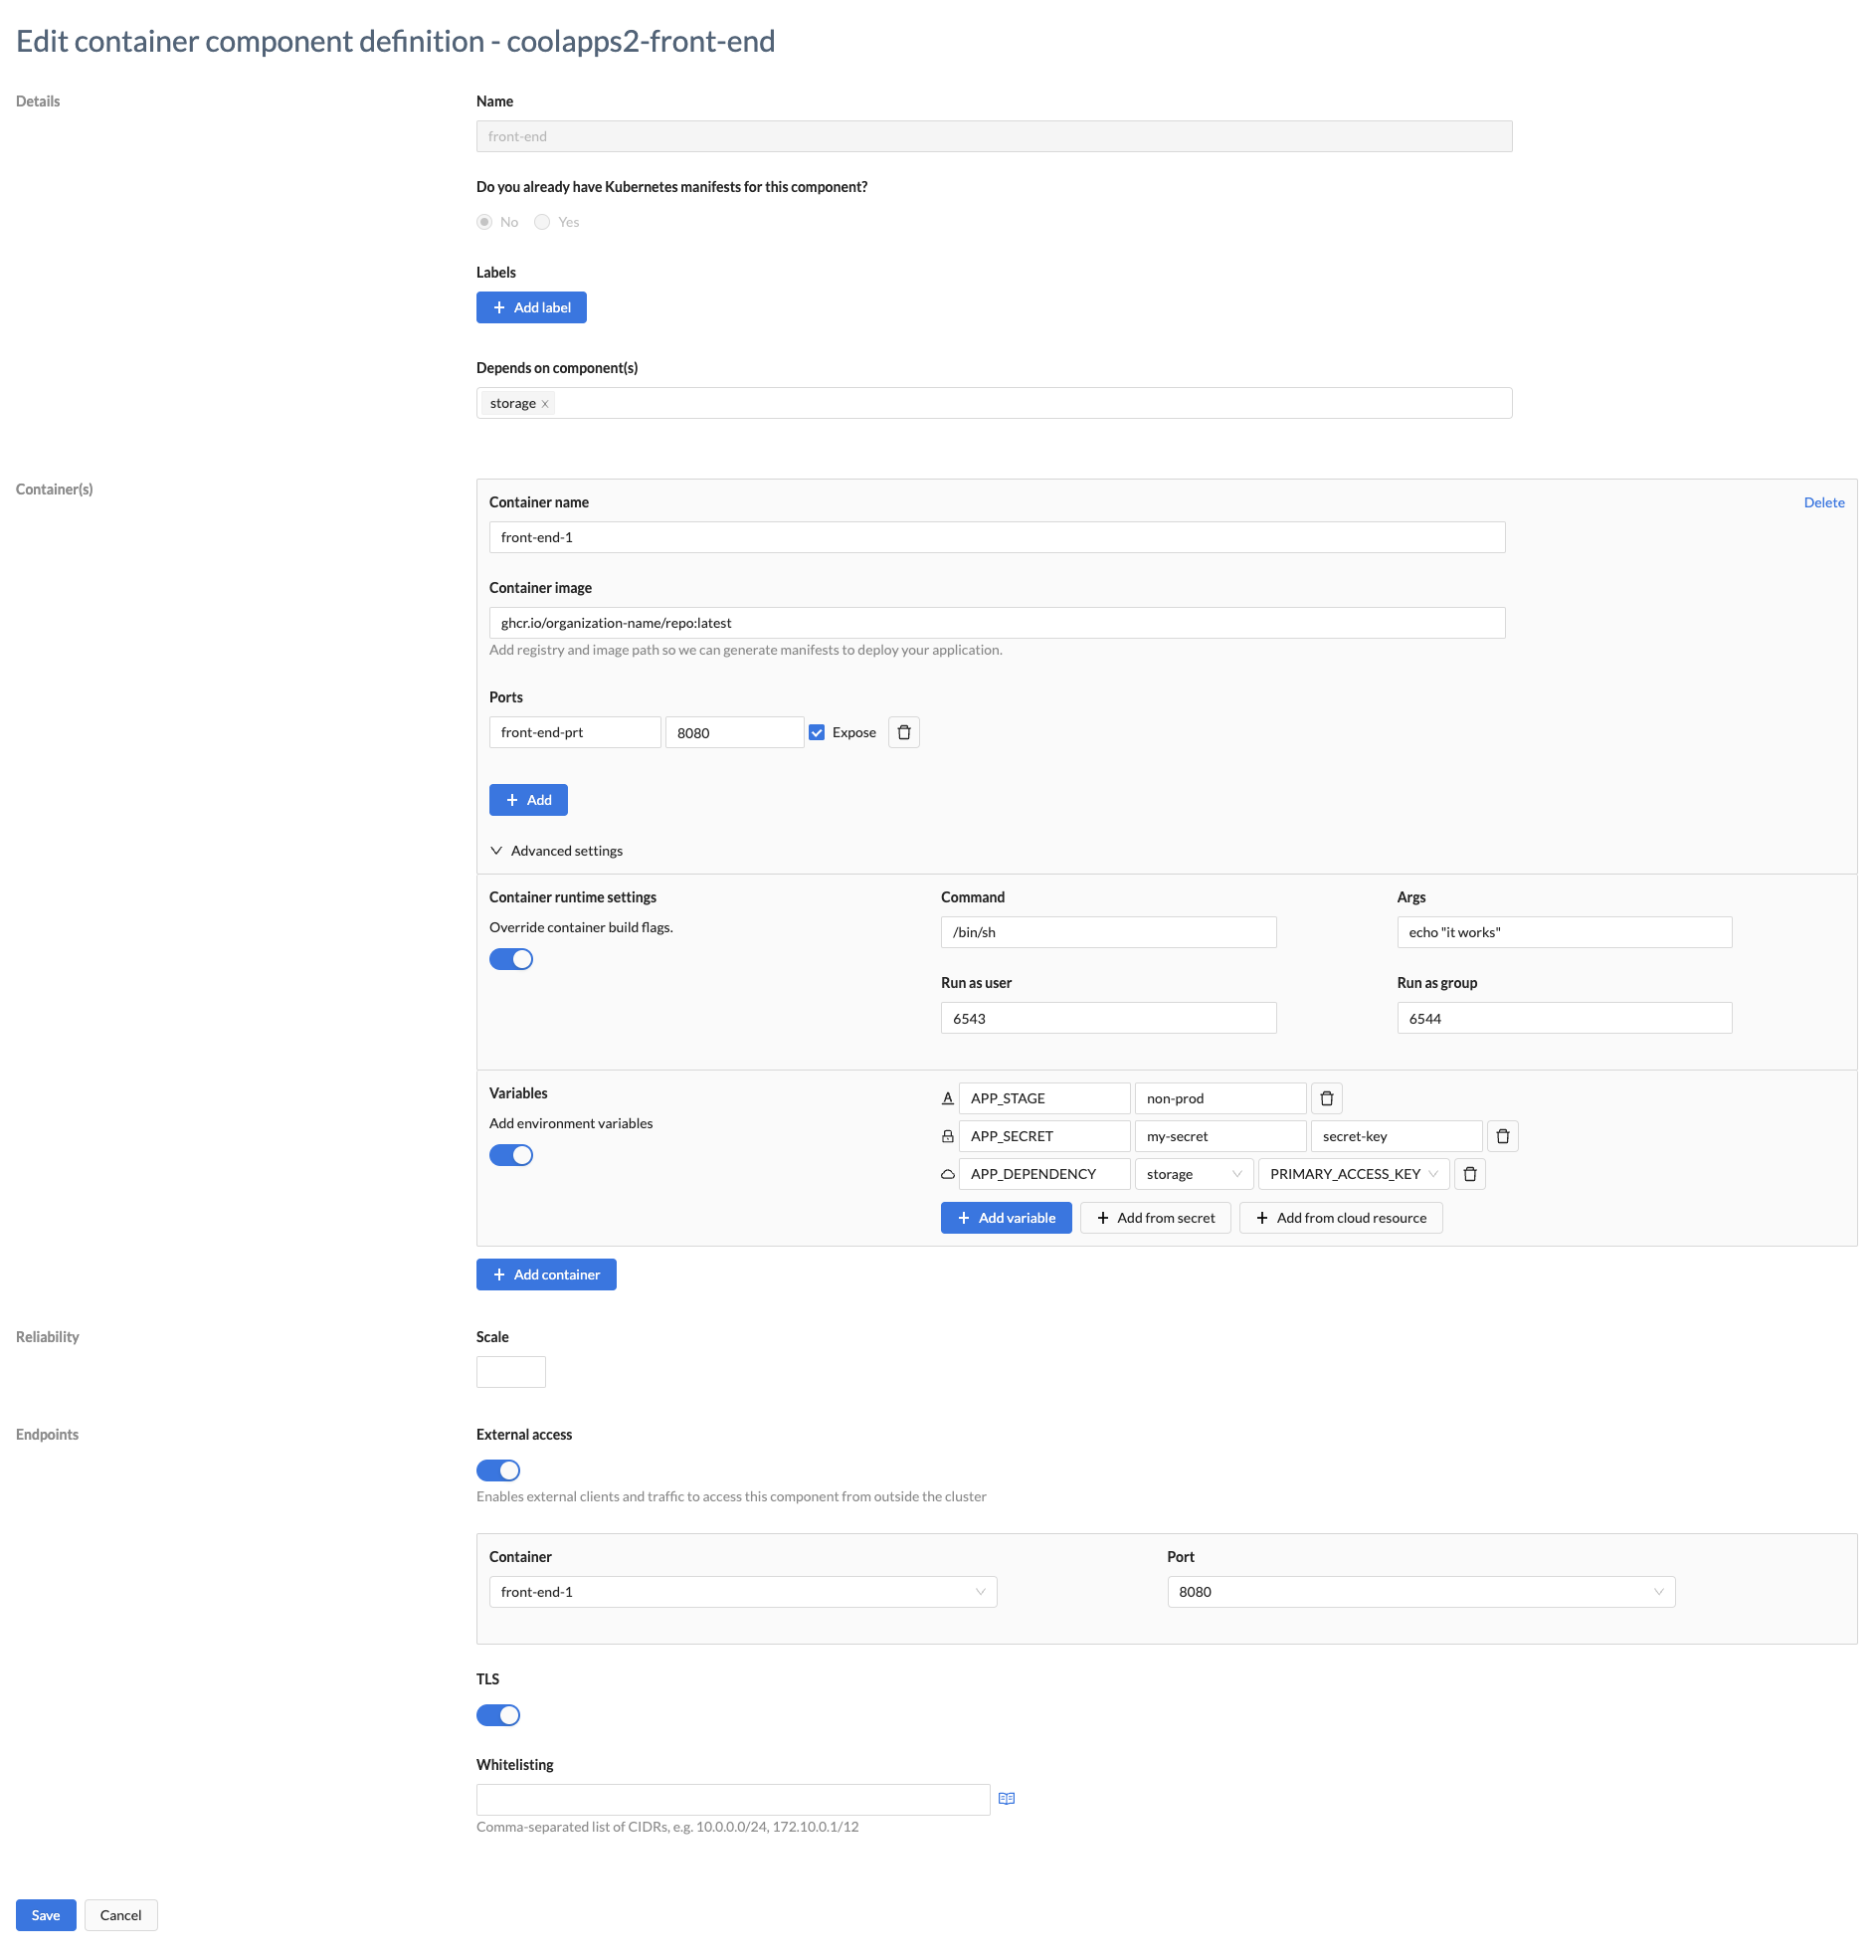
- Click on the name of a component to view the specific details for that component
Manifests (Existing & New)
- If you have existing manifests, see Use existing manifests.
- If you need to create and define manifests, see Define a new manifest.
Use existing manifests
If you already have deployment manifests for your container components, then you need to tell Wayfinder about them.
Use the --type OwnManifest flag with the wf create appcomponent command.
wf create appcomponent backend2 --app coolapps2 --type OwnManifests
◉ Waiting for resource "app.appvia.io/v2beta1/appcomponent/coolapps2-backend2" to provision (background with ctrl-c)
✔ Successfully provisioned the resource: "coolapps2-backend2"
Wayfinder will create the following manifest.
wf get appcomponent coolapps2-backend2 -o yaml

apiVersion: app.appvia.io/v2beta1
kind: AppComponent
metadata:
  labels:
    appvia.io/app: coolapps2
    appvia.io/name: backend2
  name: coolapps2-backend2
  namespace: ws-sand
spec:
  application: coolapps2
  key: backend
  name: backend2
  type: OwnManifests
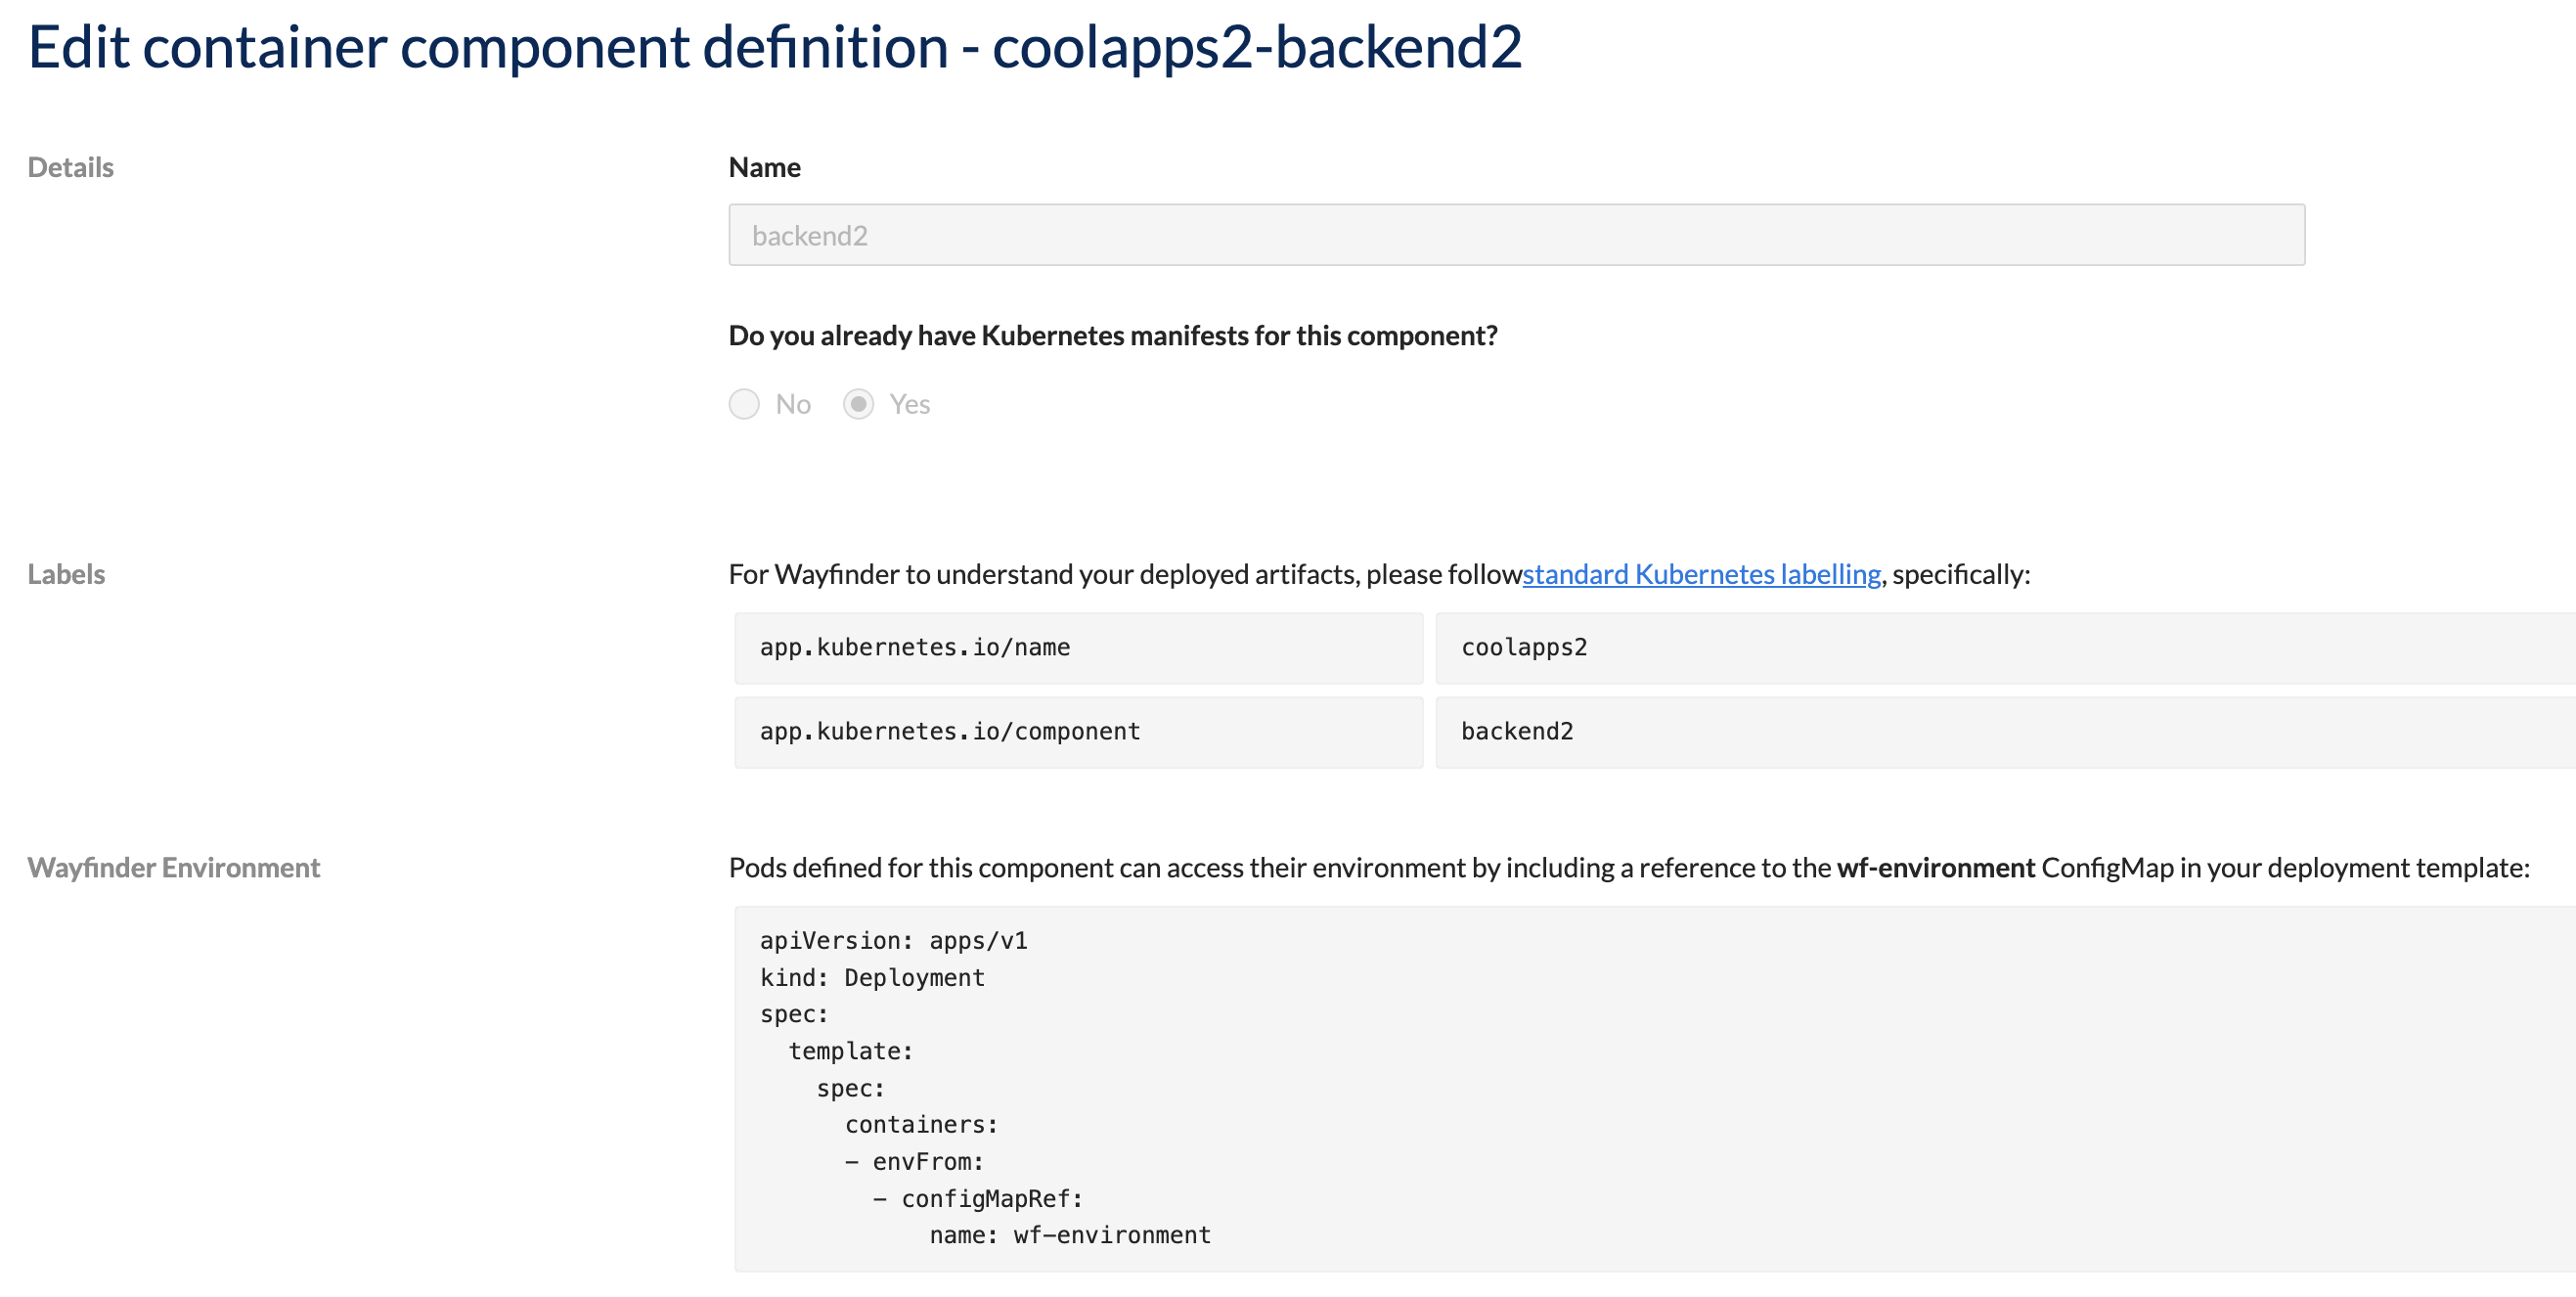
You need to include the following labels in your existing deployment manifests (such as Deployment, Service, Ingress, NetworkPolicy etc.) so that Wayfinder can keep track of them.
- app.kubernetes.io/name e.g.,
app.kubernetes.io/name : coolapps2 - app.kubernetes.io/component e.g.,
app.kubernetes.io/component : backend2
Wayfinder environments are deployed with the context of their Wayfinder-managed environments. You can access this context by referencing the wf-environment config map in your deployment manifests.
apiVersion: apps/v1
kind: Deployment
spec:
  template:
    spec:
      containers:
      - envFrom:
        - configMapRef:
            name: wf-environment
In Wayfinder's web interface:
- Click Workspaces > All Applications, then select the name of your application
- Click on Step 2 - Define Components
- Fill in the details as described in the table below
- Click Save
- Repeat above steps for each container component that Wayfinder needs to know about.
| Category | Field | Description |
|---|---|---|
| Details | Name | A unique name for the component within your application |
| Do you already have Kubernetes manifests for this component? | Select 'yes' if you already have manifests. |
You need to include the following labels in your existing deployment manifests (such as Deployment, Service, Ingress, NetworkPolicy etc.) so that Wayfinder can keep track of them:
- app.kubernetes.io/name
- app.kubernetes.io/component
Define a new manifest
If you do not have existing container component deployment manifests, then Wayfinder can create them for you.
Use the wf create appcomponent COMPONENT-NAME --app APP-NAME --type COMPONENT-TYPE --image IMAGE -w WORKSPACE to create a container component.
wf create component database1 --app coolapps2 --type container  --image ghcr.io/organization-name/repo:latest -w sand

◉ Waiting for resource "app.appvia.io/v2beta1/appcomponent/coolapps2-database1" to provision (background with ctrl-c)
✔ Successfully provisioned the resource: "coolapps2-database1"
The example above will create your database1 container component as part of your coolapps2 application within your sand workspace.
Use the wf get appcomponent APP-NAME-COMPONENT-NAME > FILENAME.yaml command to output your component's manifest details to a file.
wf get appcomponent coolapps2-database1 -o yaml > database1.yaml
Update the manifest file as needed. Use the wf apply -f PATH-TO-FILE.yaml command to apply your changes.
You can also use Wayfinder's web interface to create your container components:
- Click Workspaces > All Applications, then select the name of your application
- Click on Step 2 - Define Components
- Fill in the details as described in the table below
- Click Save
- Repeat above steps for each container component that Wayfinder needs to know about.
Where applicable, Wayfinder will use default values when you do not specify a value.
| Category | Field | Description |
|---|---|---|
| Details | Name | A unique name for this component within your application |
| Do you already have Kubernetes manifests for this component? | Select 'no' if you do not have manifests and need Wayfinder to create them for you. | |
| Labels | The labels Wayfinder should add to all generated manifests. If omitted then Wayfinder will auto-generate labels with default values. | |
| Depends on component(s) | If your container component depends on one or more cloud resource components, then you can select them from the drop-down list. If the list is empty, then you have not yet defined any cloud resource components. | |
| Container(s) | Container name | A unique name for this container within your component. You can have multiple containers. |
| Container image | You must provide a valid registry and image path for your container. | |
| Ports | Each container can have multiple ports to facilitate internal communication between container components. Enter a port name, the port number and check the box if you want to the port to be exposed to your other components. | |
| Advanced settings | You can optionally use advanced settings to override the settings of the container's build flags | |
| > Runtime settings | Container level: Command: The command to override Args: The arguments of the command to override Run as user: UID to run the entrypoint of the container process. Run as group: GID to run the entrypoint of the container process. Pod level: fsGroup: A special supplemental group that applies to all containers in a pod. For more information on security contexts, refer to SecurityContext and PodSecurityContext. | |
| > Variables | Add variable: Specify the environment value's name and a fixed literal value Add from secret: You can specify a secret as an environment variable. Specify the environment value's name, the secret it should reference, and the key value of the secret. Add from cloud resource: Specify the environment value's name. Select the cloud resource component from the drop-down list. Select the cloud resource component's output value from the drop-down list. | |
| Add container | Use the button to create as many containers as you need | |
| Replica Settings | Scale | The number of pods to be created |
| Endpoint | External access | Specify the container and port which should be exposed to external traffic |
| TLS | Transport layer security (TLS) ensures that the component is exposed with an HTTPS TLS certificate. Wayfinder creates this for you by default. Switch this off if you do not want Wayfinder to create this for you. | |
| Whitelisting | Restrict access to the specified IP ranges. Specified in CIDR notation. | |
| Click on the Save button to save your component | ||
| Click on the Cancel button to discard your changes |
Deploy Container Components
You need to create an Environment before you can deploy your components into that environment.
Use the wf deploy appcomponent CLI command with --dry-run flag to preview the container component's
manifest, before actual deployment:
wf deploy appcomponent APP-NAME APP-ENV-NAME --component COMPONENT-NAME --dry-run e.g.,
wf deploy appcomponent coolapps2 dev-env2 --component front-end --dry-run
Wayfinder uses the information you defined in the web interface to generate the respective container component deployment manifests. Wayfinder creates the following for you:
Here are examples of each of the above manifests:
Deployment manifest
coolapps2_dev-env2_front-end_deployment.yaml

apiVersion: apps/v1
kind: Deployment
metadata:
  creationTimestamp: null
  labels:
    app.kubernetes.io/component: front-end
    app.kubernetes.io/instance: dev-env2
    app.kubernetes.io/name: coolapps2
    name: front-end
  name: front-end
  namespace: sand-coolapps2-dev-env2
spec:
  replicas: 1
  selector:
    matchLabels:
      app.kubernetes.io/instance: dev-env2
      app.kubernetes.io/name: coolapps2
      name: front-end
  strategy:
    rollingUpdate:
      maxSurge: 1
      maxUnavailable: 1
    type: RollingUpdate
  template:
    metadata:
      labels:
        app.kubernetes.io/component: front-end
        app.kubernetes.io/instance: dev-env2
        app.kubernetes.io/name: coolapps2
        name: front-end
        service: front-end
    spec:
      containers:
      - args:
        - echo "it works"
        command:
        - /bin/sh
        env:
        - name: APP_STAGE
          value: non-prod
        - name: APP_DEPENDENCY
          valueFrom:
            secretKeyRef:
              key: PRIMARY_ACCESS_KEY
              name: storage-outputs
        - name: MY_DB_SECRET
          valueFrom:
            secretKeyRef:
              key: username
              name: db-secret
        - name: MY_DB_SECRET_PW
          valueFrom:
            secretKeyRef:
              key: password
              name: db-secret
        image: ghcr.io/organization-name/repo:latest
        imagePullPolicy: Always
        name: front-end-1
        ports:
        - containerPort: 8080
          name: front-end-prt
        resources: {}
        securityContext:
          allowPrivilegeEscalation: false
          capabilities:
            drop:
            - ALL
          runAsGroup: 6544
          runAsNonRoot: true
          runAsUser: 6543
          seccompProfile:
            type: RuntimeDefault
      securityContext:
        fsGroup: 65534
Service manifest
coolapps2_dev-env2_front-end_service.yaml

apiVersion: v1
kind: Service
metadata:
  labels:
    app.kubernetes.io/component: front-end
    app.kubernetes.io/instance: dev-env2
    app.kubernetes.io/name: coolapps2
  name: front-end
  namespace: sand-coolapps2-dev-env2
spec:
  ports:
  - name: front-end-prt
    port: 80
    protocol: TCP
    targetPort: 8080
  selector:
    app.kubernetes.io/instance: dev-env2
    app.kubernetes.io/name: coolapps2
    name: front-end
Ingress manifest
coolapps2_dev-env2_front-end-ingress_ingress.yaml

apiVersion: networking.k8s.io/v1
kind: Ingress
metadata:
  annotations:
    cert-manager.io/cluster-issuer: wayfinder-managed
  labels:
    app.kubernetes.io/component: front-end
    app.kubernetes.io/instance: dev-env2
    app.kubernetes.io/name: coolapps2
  name: front-end-ingress
  namespace: sand-coolapps2-dev-env2
spec:
  ingressClassName: external
  rules:
  - host: front-end-devenv2.coolapps2.marc2.appvia.dev
    http:
      paths:
      - backend:
          service:
            name: front-end
            port:
              number: 80
        path: /
        pathType: Prefix
  tls:
  - hosts:
    - front-end-devenv2.coolapps2.marc2.appvia.dev
    secretName: front-end-tls
Network Policy manifest
coolapps2_dev-env2_front-end-ingress_networkpolicy.yaml

apiVersion: networking.k8s.io/v1
kind: NetworkPolicy
metadata:
  labels:
    app.kubernetes.io/component: front-end
    app.kubernetes.io/instance: dev-env2
    app.kubernetes.io/name: coolapps2
  name: front-end-ingress
  namespace: sand-coolapps2-dev-env2
spec:
  ingress:
  - from:
    - namespaceSelector:
        matchLabels:
          kubernetes.io/metadata.name: ingress
    ports:
    - port: 8080
      protocol: TCP
  podSelector: {}
  policyTypes:
  - Ingress
Container Runtime Settings
You can override the entrypoint runtime settings of your container components.
- Command: The command to override
- Args: The arguments of the command to override
- Run as user: UID to run the entrypoint of the container process
- Run as group: GID to run the entrypoint of the container process
- fsGroup: A special supplemental group that applies to all containers in a pod
Wayfinder will update the container component's manifest as per below example:
   spec:
      containers:
      - args:
        - echo "it works"
        command:
        - /bin/sh
        env:
        securityContext:
          runAsGroup: 6544
          runAsNonRoot: true
          runAsUser: 6543

Environment variables
You can create environment variables that reference:

Referencing Fixed Literal Values
Your container component's environment variables can reference a fixed literal value such as a string value. Wayfinder will update the container component's manifest as shown below:
spec:
  application: coolapps2
  container:
    containers:
    - env:
      - name: APP_STAGE
        value: non-prod   <-- This is the string value
Referencing Kubernetes Secrets
When your environment variables reference sensitive information you should use secrets.
You can create secrets using kubectl e.g.,
kubectl create secret generic db-secret --from-literal=username=dbuser123 --from-literal=password=password4dbuser123
Before you can run the above command you first need to access your environment with wf access env APPLICATION-NAME ENVIRONMENT-NAME e.g.,
wf access env coolapps2 dev-env2
? Which role would you like to use?
  ▸ namespace.admin
    namespace.edit
    namespace.troubleshooting
    namespace.view
    secrets.view

Owner:    ws-sand
CLI Show: $ wf get role namespace.admin -o yaml

Full namespace administration

◉ Waiting for access role binding to be ready.....
✔ Access to cluster aks-hhbf7 with role namespace.admin granted until: 03 Aug 23 19:25 BST
✔ Current kubectl context set to sand.aks-hhbf7 and namespace set to sand-coolapps2-dev-env2

kubectl create secret generic db-secret --from-literal=username=dbuser123 --from-literal=password=password4dbuser123
secret/db-secret created
You can reference the above secret in Wayfinder's container component's environment variables as follow:
Environment Variable 1:
- Variable Name: MY_DB_SECRET
- Secret: db-secret
- Key: username
Environment Variable 2:
- Variable Name: MY_DB_SECRET_PW
- Secret: db-secret
- Key: password
The above secrets are referenced in the container component's manifest as follow:
kind: AppComponent
spec:
  application: coolapps2
  container:
    containers:
    - env:
      - fromSecret:
          key: username       <-- This is the key-value that your secret references
          name: db-secret     <-- This is the name of your secret
        name: MY_DB_SECRET    <-- This is the name of your environment variable
      - fromSecret:
          key: password
          name: db-secret
        name: MY_DB_SECRET_PW
You will get an error with wf deploy appcomponent command if you reference a secret that does not exist e.g.,
wf deploy appcomponent coolapps2 dev-env2 --component front-end --dry-run

Error: component container front-end/front-end-1 references a secret that doesn''t exist: "db-secret2"
Referencing Cloud Resources
You can reference the output values of cloud resources.
In Wayfinder's web interface, ensure that you have:
- Created one or more cloud resources
- Selected the cloud resource component under Depends on components
- Referenced the cloud resource's output value using the Add from cloud resource button
The cloud resource are referenced in the container component's manifest as follow:
kind: AppComponent
spec:
  application: coolapps2
  container:
    containers:
    - env:
      - fromCloudResourceOutput:
          componentName: postgresql1   <-- postgresql1 is the name of the cloud resource component you created
          output: SERVER_NAME          <-- This is the name of the output value from your cloud resource
        name: APP_DEPENDENCY           <-- This is the name of your environment variable
Referencing Template Variables
You can use Wayfinder's template variables to access specific details about your application's context, such as the cluster' information where your application is deployed.
For more information, refer to the template variables section.
In the example below Cluster.Name will be replaced with the actual name of the cluster, assigning it to your variable clusterName.
spec:
  application: app1
  container:
    containers:
    - env:
      - fromAppEnv:
          name: Cluster.Name     <-- the environment variable
        name: clusterName        <-- your variable
Endpoints
Endpoints allow your application's components to talk to one another and/or to the outside world.
The network configuration such as DNS Zones and IP Ranges are pre-determined by your administrator.
If you want to enable communication between components of your application or with other applications inside the cluster where your application is running, you can do so by ticking the Expose checkbox next to the desired container's port.

If you want to expose one of your container's ports to external traffic, allowing communication from outside the cluster in which your application is running, you must enable it as follow:
- Toggle the External Access to on
- Select a container name
- Select a port
- TLS is enabled by default
- Optionally whitelist CIDR ranges as applicable

Cloud Resource Components
A cloud resource component represents a dependency of your application served by a cloud service, such as a database, storage bucket, or message queue. When defining a cloud resource component, you must to specify a cloud resource plan, corresponding to a Terraform module that has been made available to your workspace by your Wayfinder administrator.
View Cloud Resource Components
Use the wf get appcomponent command to view a list of cloud resource components. The TYPE column will have a value of CloudResource.
wf get appcomponent

NAME                         APPLICATION        COMPONENT NAME    TYPE             AGE
cideploy-backend             cideploy           backend           Container        26h
cideploy-database            cideploy           database          Container        26h
coolapps2-front-end          coolapps2          front-end         Container        43m
coolapps2-storage            coolapps2          storage           CloudResource    4m12s
Use the wf get appcomponent COMPONENT-NAME -o yaml command to view the manifest details of a specific cloud resource component.
wf get appcomponent coolapps2-storage -o yaml

apiVersion: app.appvia.io/v2beta1
kind: AppComponent
metadata:
  labels:
    appvia.io/app: coolapps2
    appvia.io/name: storage
  name: coolapps2-storage
  namespace: ws-sand
spec:
  application: coolapps2
  cloudResource:
    plan: appvia-azurerm-demo-storage-account
    variables:
      allow_nested_items_to_be_public: ""
      blob_versioning_enabled: ""
      container_name: storage
      name: ""
  key: storage
  name: storage
  type: CloudResource
Manifests
Use the wf create appcomponent COMP-NAME --app APP-NAME --type cloudresource --plan PLAN-NAME --plan-version SEMVERSION -w WORKSPACE to create a new cloud resource component.
You need to specify a valid Cloud Resource Plan.
wf create appcomponent sqldb1 --app coolapps2 --type cloudresource --plan azure-azurerm-postgresql --plan-version 1.0.0 -w sand

◉ Waiting for resource "app.appvia.io/v2beta1/appcomponent/coolapps2-sqldb1" to provision (background with ctrl-c)
✔ Successfully provisioned the resource: "coolapps2-sqldb1"
The example above will create your sqldb1 cloud resource component as part of your coolapps2 application within your sand workspace.
If you do not specify a cloud resource plan, then you will get an error:
Error: must provide --plan to create a cloudresource component
Use the wf get appcomponent APP-NAME-COMPONENT-NAME > FILENAME.yaml command to output your component's manifest details to a file.
wf get appcomponent coolapps2-sqldb1 -o yaml > sqldb1.yaml
Update the manifest file as needed. Use the wf apply -f PATH-TO-FILE.yaml command to apply your changes.
You can also use Wayfinder's web interface to create your cloud resource components:
- Select Workspaces, and then navigate to All Applications
- Select the name of your application
- Click on Create > Cloud Resource Component button
- Fill in the details as described in the table below
- Click Save
| Category | Field | Description |
|---|---|---|
| Details | Name | A unique name for this component within your application |
| Resource Type | You need to choose the relevant Resource Type from the drop-down menu. Administrators use Cloud Resource Plans to define which terraform modules are available in your workspace along with the respective input and output values for that terraform module. | |
| Plan Version | The version of the cloud resource plan. | |
| Inputs | [Various Inputs] | Provide values for inputs. Use the information icon for a description of each input field. The inputs that you can specify are determined by your Administrator. |
| Get from App Env variable | When checked, Wayfinder will derive the value from the application environment's context. See Variables section for more information. | |
| Available outputs | [Various Outputs] | If your terraform module provides multiple output values, then click on the Show all link. Use the information icon for a description of each output field. The output values that are available are specified by your Administrator. You can reference these outputs when you define your container component variables under Containers > Advanced Settings > Variables > Add from cloud resource |
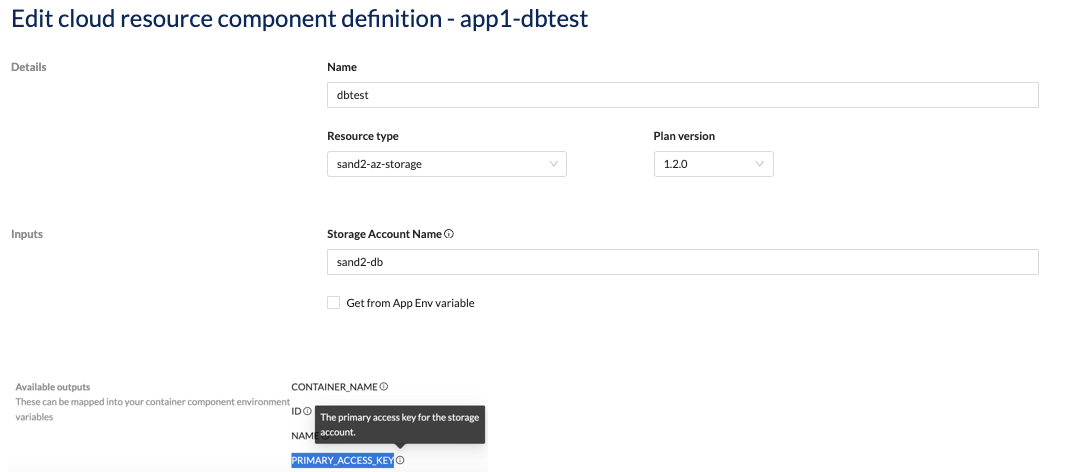
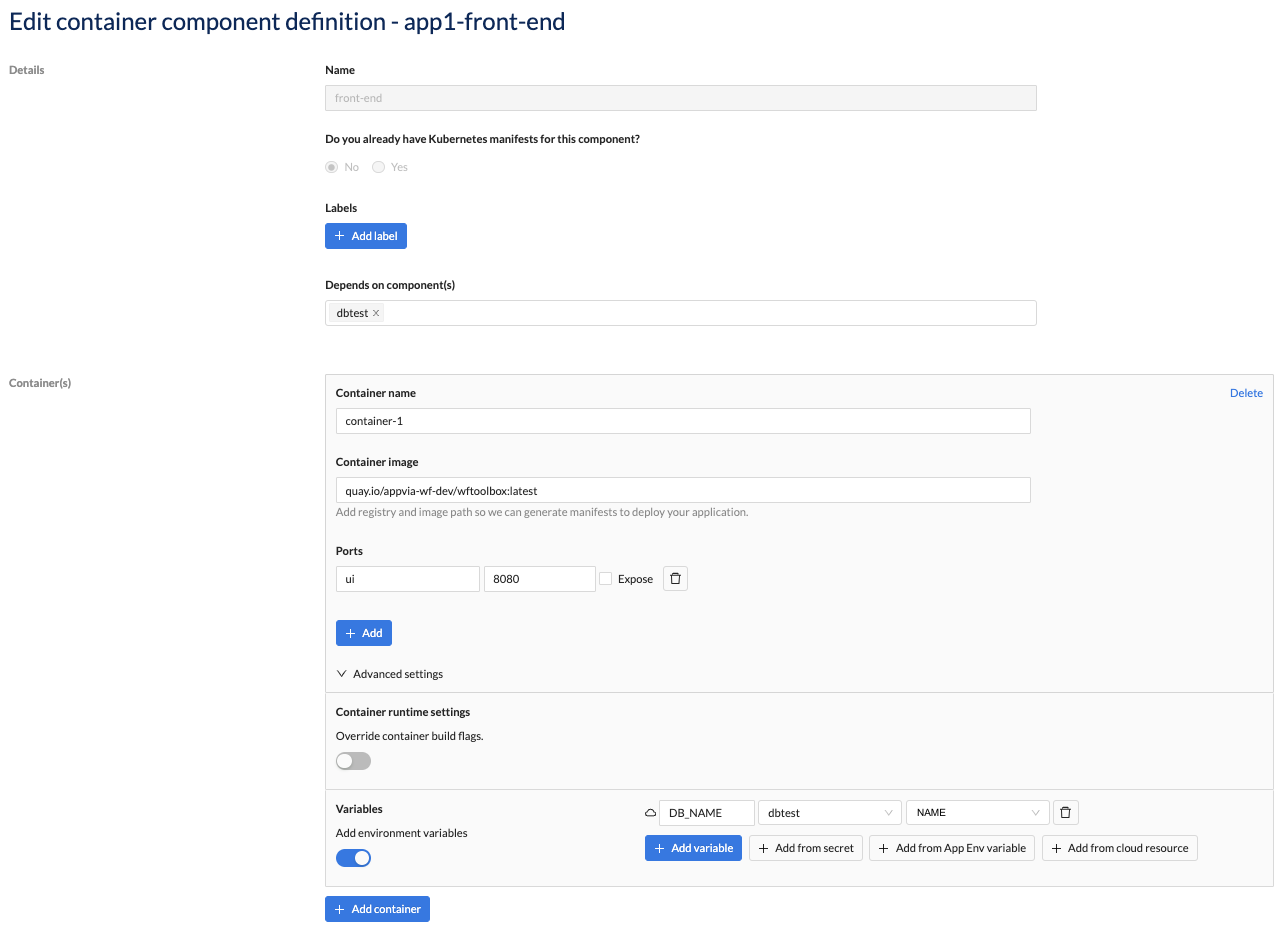
You can reference the outputs (e.g., NAME) in your container component's environment variables (e.g., DB_NAME) when you click the Add from cloud resource button.
Deploy Cloud Resource Components
You need to create an Environment before you can deploy your cloud resource components into that environment.
Use the wf deploy appcomponent CLI command with --dry-run flag to preview the cloud resource component's
manifest, before actual deployment:
wf deploy appcomponent APP-NAME APP-ENV-NAME --component COMPONENT-NAME --dry-run e.g.,
wf deploy appcomponent coolapps2 dev-env2 --component front-end --dry-run
Wayfinder uses the information you defined in the web interface to generate the respective cloud resource component deployment manifest files. Wayfinder creates the following:
Configuration manifest
coolapps2_dev-env2_storage_configuration.yaml

apiVersion: terraform.appvia.io/v1alpha1
kind: Configuration
metadata:
  labels:
    app.kubernetes.io/component: storage
    app.kubernetes.io/instance: dev-env2
    app.kubernetes.io/name: coolapps2
    name: storage
  name: storage
  namespace: sand-coolapps2-dev-env2
spec:
  auth: null
  enableAutoApproval: true
  module: https://github.com/appvia/terraform-azurerm-demo-storage-account?ref=v1.0.0
  providerRef:
    name: default
  variables:
    account_kind: ""
    account_tier: ""
    allow_nested_items_to_be_public: ""
    blob_versioning_enabled: ""
    container_access_type: ""
    container_delete_retention_days: "0"
    container_name: storage
    default_network_rule: Allow
    enable_hns: false
    location: uksouth
    name: ""
    replication_type: LRS
    resource_group_name: wf-ws-app-aks-abfek-infra-uksouth
    shared_access_key_enabled: true
    tags:
      name: demo-storage-account
  writeConnectionSecretToRef:
    name: storage-outputs