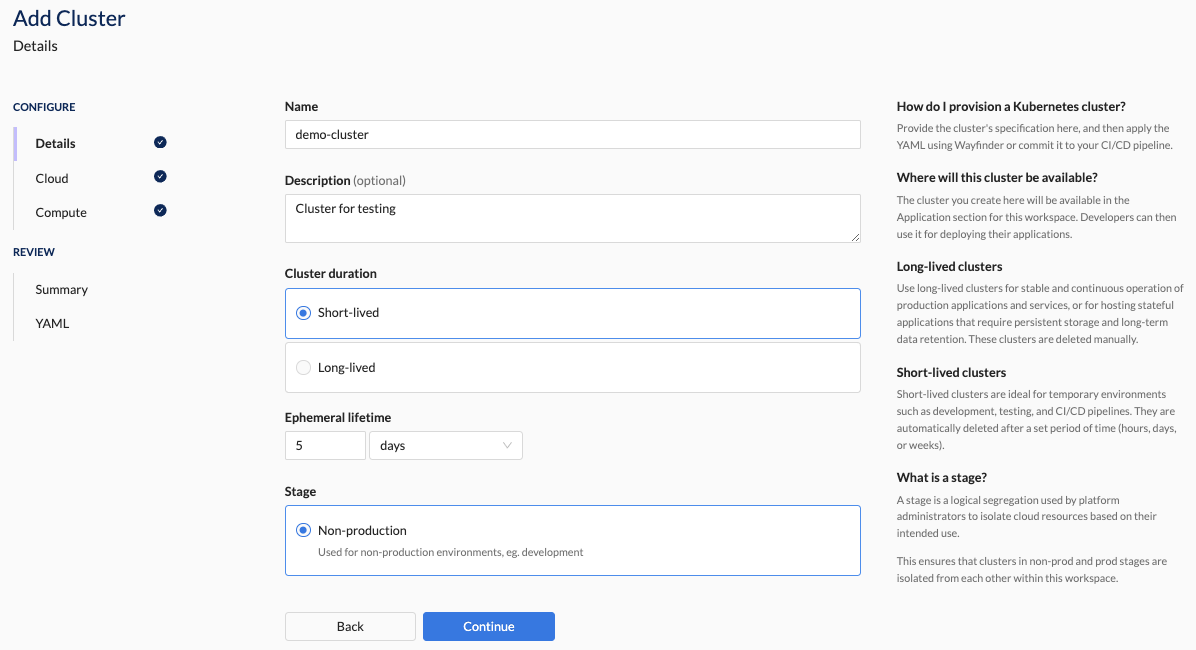
Self-Service Cluster Provisioning Details

Overview
- Identification and Description: Naming and describing your self-service cluster help workspace members (developers) identify the purpose and configuration details of provisioned clusters (AppEnvs), ensuring that they select the most appropriate one for their application deployments.
- Cluster Duration: Choose short-lived (ephemeral) clusters for temporary environments for hosting development applications and long-lived clusters for stable production applications and services. You can specify when Wayfinder should should auto-deleted (days, hours, weeks) the ephemeral cluster.
- Stage: A stage is a logical segregation used by platform administrators to isolate cloud resources based on their intended use. This ensure that you can't accidently create clusters in sensitive places like production environments.
Wayfinder allows you to create a self-service cluster using its CLI or Web Interface. For newcomers, starting with the Web Interface helps in understanding Wayfinder's concepts and the structure of Wayfinder's self-service cluster YAML files.
📚 For more details on key points, refer to the overview section.
📚 Explore the properties section for additional information on each UI property.
CLI Instructions
Create a new Self-Service cluster
When provisioning a self-service cluster using the CLI, you have two options: using Wayfinder's interactive prompts or specifying the full command. Wayfinder will perform validation checks before creating the cluster.
Interactive Prompts
To create a cluster interactively, use the wf create cluster CLUSTER -w WORKSPACE command. Wayfinder will guide you through a series of questions where you select the appropriate properties for your configuration. This method eases the process by eliminating the need to manually input all parameters.
~ wf create cluster demo3 -w sand2
? Region continent: Europe
? Region: uksouth
? Cluster plan: test
? Plan version: 2.0.0 (Kubernetes 1.30)
? Compute template: aks-general-purpose
◉ Waiting for cluster "demo3" to be ready
  ◉ Waiting for Cluster plan valid............................................................................................................................................
  ✔ Cluster plan valid complete
  ✔ Cloud account available complete
  ✔ Network provisioned complete
  ✔ Cluster provisioned complete
  ✔ Service account ready complete
  ✔ Node pools provisioned complete
  ✔ Cluster configured complete
  ✔ Cluster plan packages deployed complete
  ✔ Cluster healthy complete
  ✔ Kube proxy access ready complete
  ✔ Obsolete resources handled complete
  ✔ Upgrade scheduled complete
  ✔ Cluster TTL applied complete

Since this is the first cluster in the workspace, a few tips:

# You can provision a namespace to deploy into via
$ wf create namespace <name>

# User access to the cluster is short-lived and performed via
$ wf access cluster --help

# Access token for automated deployments can be created via
$ wf create workspaceaccesstoken --help
$ wf assign accessrole --help
Full command
Alternatively, you can use the complete command format to create a cluster:
wf create cluster CLUSTER -w WORKSPACE -s STAGE -p CLUSTERPLAN -v VERSION -c COMPUTETEMPLATE -a CLOUACCESS -r REGION
wf create cluster demo4 -w sand2 -s nonprod -p aks-sandbox -v 1.0.0 -c aks-general-purpose -a joebloggs-sand2 -r uksouth
◉ Waiting for cluster "demo4" to be ready

  ◉ Waiting for cluster to be reconciled.
  ◉ Waiting for Cluster plan valid.......................................................................................................................................................
  ✔ Cluster plan valid complete
  ✔ Cloud account available complete
  ✔ Network provisioned complete
  ✔ Cluster provisioned complete
  ✔ Service account ready complete
  ✔ Node pools provisioned complete
  ✔ Cluster configured complete
  ✔ Cluster plan packages deployed complete
  ✔ Cluster healthy complete
  ✔ Kube proxy access ready complete
  ✔ Obsolete resources handled complete
  ✔ Upgrade scheduled complete
  ✔ Cluster TTL applied complete

You can access the cluster using: $ wf access cluster -w sand2
If you wish to bootstrap the YAML for a self-service cluster to manage using your CI process, you can use wf init cluster exactly as per wf create cluster above. This will provide the same prompts then output the YAML of the cluster which you can then apply as needed.
Web Interface Instructions
Note that Wayfinder's User Interface has several sections you need to follow in order to create a new self-service cluster. Below only outlines the Details section.
Steps
- Expand Workpsaces, and then navigate to YOUR-WORKSPACE-NAME > Clusters
- Click the +Cluster button
- Fill in the details as outlined in the properties section.
- Click Continue to proceed
Screenshot(s)

Properties
| Field | Description |
|---|---|
| Name | The name of the cluster (e.g., dev-cluster). Assists developers in selecting the correct self-service cluster (AppEnv) for their application deployment |
| Description | A short description describing the purpose of the self-service cluster (e.g., cluster with low cost node pool configuration for testing purposes). |
| Cluster Duration | The duration before the cluster is deleted either manually or automatically. Option(s): - Long-lived: manually deleted. - Short-lived: automatically deleted after set period of time (hours, days, weeks) |
| Stage | Scoped to specified stage such as prod or nonprod. |